Understanding Guitar Capo Usage and Transposition
You’ll master guitar capos by understanding they’re movable clamps that raise your instrument’s pitch one semitone per fret, allowing familiar chord shapes to create new voicings without learning complex fingerings. Position the capo just behind each fret with perpendicular alignment across all strings, maintaining balanced pressure to prevent buzzing while ensuring clean notes. Different capo types—spring-loaded, screw-type, or clamp varieties—offer varying tension control and compatibility with your guitar’s fretboard radius, and exploring these techniques reveals countless creative possibilities.
We are supported by our audience. When you purchase through links on our site, we may earn an affiliate commission, at no extra cost for you. Learn more.
Notable Insights
- A capo is a movable clamp that raises guitar pitch by one semitone per fret position.
- Position the capo just behind the fret, perpendicular to strings, with balanced pressure to avoid buzzing.
- Capos allow familiar chord shapes to be played in higher keys for vocal or instrumental matching.
- Use transposition charts to map original chords against capo positions for easy key changes.
- Different capo types (spring-loaded, screw-type, clamp) offer varying benefits for performance and precision control.
What Is a Guitar Capo and How Does It Work
A capo represents one of those brilliantly simple inventions that transforms how you approach the guitar, acting as a movable clamp that presses down across all strings at any given fret to instantly change your instrument’s pitch and key.
Understanding capo history reveals its evolution from basic metal rings with rubber strips in the mid-19th century to today’s sophisticated spring-loaded mechanisms.
The capo mechanics work by shortening your strings’ vibrating length, effectively raising their pitch uniformly—place it on the second fret, and your open E chord suddenly becomes F#. The term capo is an abbreviation of the Italian word “capotasto” meaning head of the fretboard.
This clever device fundamentally replaces your index finger’s barre function, allowing you to transpose entire songs without relearning chord shapes, making complex keys accessible through familiar fingerings you’ve already mastered. Many guitarists find capos particularly beneficial for adjusting pitch to match a singer’s vocal range during performances.
Proper Capo Placement Techniques for Optimal Sound
While understanding capo mechanics provides the foundation, I’ve learned that proper placement technique makes the difference between a professional sound and frustrating buzz, muted strings, or pitch problems that’ll have you questioning your sanity.
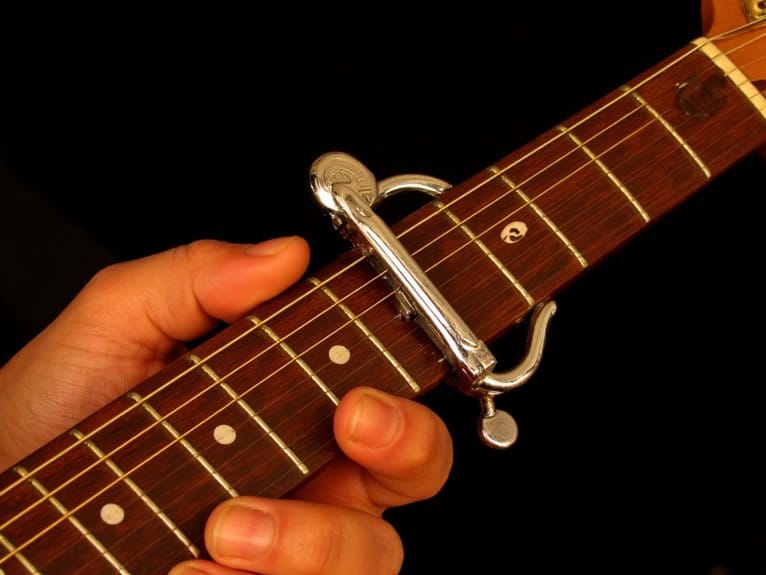
Position your capo just behind the fret, not directly on top, maintaining perpendicular capo alignment across all strings to prevent intonation issues.
Precise capo placement just behind the fret with perpendicular alignment prevents intonation problems and ensures clean sound across all strings.
I’ve discovered that string pressure balance remains critical—too much tension bends strings and worsens playability, while insufficient pressure creates buzz and muted notes. After placement, test various chords to detect problems, adjusting tension accordingly.
Different capo types require specific approaches: spring capos need firm, quick placement, while screw-on models allow incremental adjustments for ideal sound quality and playing comfort. For recording purposes, consider how your capo affects the signal going into your audio interface to ensure the cleanest possible capture. If you’re performing live and need amplification, the capo’s placement can influence how well your acoustic guitar pickups capture the modified string tension and altered resonance. Remember to always tune the guitar after capo application since the added tension can cause slight pitch variations that affect overall sound quality.
Transposing Songs and Chords With a Capo
Once you’ve mastered proper capo placement, I’ve found that understanding transposition becomes the game-changer that opens up countless musical possibilities you never knew existed.
When you place your capo on any fret, you’re fundamentally creating new capo chords by raising the pitch one semitone per fret, which means that familiar G shape becomes G# at the first fret, A at the second fret, and so on.
My best transposition tips involve using charts that map original chord shapes against capo positions, allowing you to quickly identify resulting chord names without mental gymnastics.
This approach lets you match vocalists’ preferred keys, accommodate other instruments, and experiment with different tonal qualities while maintaining those comfortable, open chord fingerings you already know.
Types of Capos and Choosing the Right One
Mastering transposition opens the door to exploring capo varieties, and I’ve discovered that selecting the right capo can dramatically impact your playing experience, tuning stability, and overall sound quality.
Understanding capo mechanism differences helps you make informed decisions—spring-loaded trigger capos excel for live performance with one-handed operation, while screw-type models provide precise tension control for unusual neck shapes.
Spring-loaded capos deliver quick live performance changes while screw-type models offer precise tension control for challenging neck profiles.
I’ve found that clamp capos remain most popular due to their portability and ease of use, though toggle capos offer adjustability at the expense of quick changes.
Ensuring compatibility across different guitar types requires matching the capo’s curve to your fretboard radius, whether you’re playing acoustic, electric, or twelve-string instruments, since proper fit prevents buzz and maintains intonation. Similar to microphones requiring specific SPL handling capabilities for different instruments, capos need appropriate pressure ratings to accommodate varying string tensions without compromising sound quality.
When evaluating construction materials, look for aluminum alloy or zinc builds that provide the durability needed for consistent performance while protecting your instrument’s finish with silicone padding.
Just as audio interfaces require phantom power to support condenser microphones, capos need proper spring tension or adjustment mechanisms to maintain consistent pressure across all strings without damaging your guitar’s neck or frets.
Creative Applications and Musical Benefits of Capo Usage
Three fundamental ways in which capos transform your musical expression—tonal expansion, simplified transposition, and enhanced playability—reveal why I’ve come to regard them essential creative tools rather than mere convenience accessories.
Through capo experimentation, you’ll discover chord voicings impossible with standard fingerings, while partial capos release drone effects characteristic of traditional folk styles.
I’ve found that tonal exploration becomes remarkably fluid when you can shift pitch centers incrementally, maintaining familiar shapes while accessing brighter harmonic territories.
The increased string tension improves articulation for fingerpicking, though I’ll admit it took time to appreciate how capos liberate your fretting hand for embellishments and suspensions that would otherwise require awkward stretches or complex barre chord configurations.
Frequently Asked Questions
Can Using a Capo Damage My Guitar’s Neck or Fretboard Over Time?
Using a capo won’t damage your guitar’s neck or fretboard with proper use. However, excessive capo pressure left continuously can cause minor indentations and affect neck relief, so always remove it after playing.
Why Do My Strings Go Out of Tune When I Move the Capo?
Moving your capo changes capo tension on the strings, causing pitch shifts. Different string gauge responds unevenly to pressure changes, and repositioning alters the effective string length, making your guitar sound out of tune.
Can I Use a Capo on Electric Guitars or Just Acoustic Guitars?
You can definitely use capos on electric guitars! Capo benefits include easy key changes and open chord shapes. Master capo techniques by choosing radiused designs, checking tuning after placement, and using gentle pressure to avoid buzz.
How Do I Prevent String Buzzing When Using a Capo on Higher Frets?
Guarantee proper capo placement just behind the fret without overtightening. Check your guitar’s fret action – if it’s too low, raise it at the bridge. You might also need neck relief adjustment for higher fret positions.
On a final note
You’ve now got the essential knowledge to transform your playing with a capo, from basic chord transposition to advanced creative applications. Whether you’re adapting songs to match your vocal range, exploring new voicings, or simplifying complex progressions, your capo becomes an invaluable tool for musical expression. Don’t hesitate to experiment with different positions and techniques—you’ll discover unique sounds that’ll enhance your musical journey and expand your creative possibilities considerably.