Recording Drums in Small Spaces
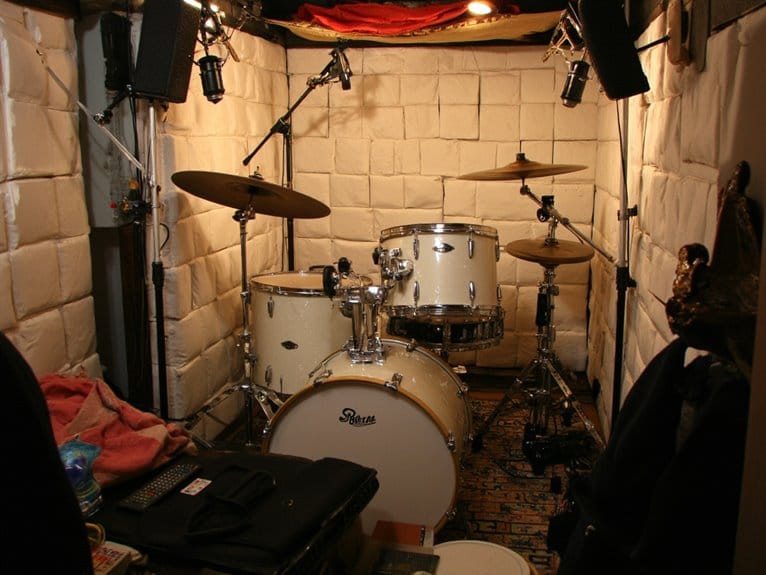
When recording drums in small spaces, you’ll need to embrace your room’s natural characteristics rather than fighting them, which means positioning your kit under the tallest ceiling point and using strategic acoustic treatment like bass traps in corners and absorption panels on adjacent walls. I’ve found that minimal mic setups work best-typically one or two overheads focused on cymbals, plus dedicated kick and snare mics-while smaller drum configurations with 20″ kicks reduce problematic reflections. The techniques below will transform your spatial limitations into sonic advantages.
We are supported by our audience. When you purchase through links on our site, we may earn an affiliate commission, at no extra cost for you. Learn more.
Notable Insights
- Use smaller drum kits with 20″ kicks and 14″ floor toms to reduce reflections and fit better in tight spaces.
- Position drums under the tallest ceiling point and arrange in triangular configuration around the throne for optimal sound and space efficiency.
- Install absorption panels on adjacent walls and bass traps in corners to control problematic reflections and low-frequency buildup.
- Employ minimal microphone setup with 1-2 overheads, kick, and snare mics to reduce phase issues in confined spaces.
- Place room microphones outside the recording space or open doors to adjacent areas for natural ambient sound capture.
Optimizing Your Room’s Acoustics and Treatment
Why does recording drums in a small space often sound like you’re trapped inside a cardboard box with a marching band? The answer lies in understanding reverberation control and implementing strategic sound absorption techniques that’ll transform your cramped recording environment into something actually usable.
Start by measuring your room’s RT60 to quantify how long sound takes to decay. Then identify those pesky reflective surfaces causing problematic hotspots through careful listening tests.
Install absorption panels on two adjacent walls where early reflections occur, positioning them two inches off the wall surface to maximize their effectiveness. Place bass traps in corners where low frequencies accumulate, and don’t forget acoustic clouds suspended from the ceiling to manage vertical reflections that create flutter echoes in your compact space. Consider incorporating diffusion panels to scatter remaining sound waves and create a more even sound field throughout your small recording environment. Since small spaces require frequent equipment adjustments, invest in hardware with memory locks to maintain consistent positioning between recording sessions.
Experiment with your drum kit orientation within the treated space to find the optimal positioning that complements your acoustic improvements. Additionally, ensure your recording equipment receives clean power through proper power conditioning to eliminate electrical noise that could compromise your carefully crafted acoustic environment.
Strategic Microphone Selection and Positioning
When you’re working with a small recording space, choosing the right microphones becomes less about having an impressive collection and more about strategic selection that’ll actually work with your room’s limitations. You’ll want to focus on essential microphone types like large diaphragm condensers and ribbon mics, which excel at capturing detailed reflections even in cramped quarters.
| Mic Position | Primary Purpose | Small Room Benefit |
|---|---|---|
| Overhead (1-2) | Overall kit capture | Reduces phase issues |
| Kick (inside/outside) | Attack and body balance | Controls room bleed |
| Snare (top/bottom) | Full tonal character | Minimizes reflections |
| Room/Boundary | Ambient enhancement | Adds perceived space |
Smart mic placement means keeping close mics tight to sources while strategically positioning room mics to add life without overwhelming your mix. In particularly tiny spaces, consider recording in mono rather than stereo to maximize your options for panning other instruments in the final mix. Start your recordings without compression, EQ, or processing to capture the natural blend of multiple mic signals for optimal depth and dimensionality in your sound.
Capturing Natural Ambience and Room Sound
Once you’ve got your microphones positioned strategically around your kit, the real magic happens when you start capturing the natural character of your space, even if that space feels more like a walk-in closet than Abbey Road.
Your room microphone becomes the secret weapon for transforming a cramped environment into something surprisingly usable, requiring careful exploration with headphones to find sweet spots where your drums sound full rather than boxy.
I’ve discovered that opening doors slightly to adjacent hallways or placing a condenser mic just outside your recording space, angled away from direct sound, captures those ambient reflections that simulate a larger acoustic environment while avoiding harsh, unwanted reverberations that plague small rooms. Positioning your kit under the tallest point in your room maximizes whatever natural reverb is available, even in confined spaces.
Drum Kit Preparation and Setup Techniques
Three fundamental principles will transform your cramped recording space from a drum-destroying nightmare into a surprisingly workable setup, starting with strategic positioning that treats your kit like a puzzle piece rather than a bulldozer.
Your drum kit arrangement should follow a triangular configuration around your throne, which you’ll position in a corner to maximize available floor space while maintaining ergonomic reach to every component.
Position your throne in the corner and arrange drums in a triangle around it for maximum space efficiency and ergonomic reach.
I’ve learned that smaller kits with 20″ kicks and 14″ floor toms actually sound better in tight spaces than their oversized counterparts, reducing overwhelming reflections that plague small rooms.
Focus your hardware selection on compact, adjustable stands and simplified kick pedals like the KT-10, which’ll save precious floor real estate while maintaining the functionality you need for professional recordings.
Recording Methods and Post-Production Strategies
While your perfectly positioned drum kit represents half the battle in small space recording, your microphone selection and placement strategy will ultimately determine whether you capture professional-sounding drums or a muddy mess of reflections and phase cancellation.
I recommend using minimal mics-one or two overheads, kick, and snare-to reduce phase issues. Focus your overheads specifically on cymbals rather than the entire kit, maintaining equal distance from the snare for phase coherence.
In post-production, your mixing techniques should address small room problems through strategic EQing to eliminate boxiness, careful gating on close mics, and phase alignment between tracks.
On a final note
You’ve got everything you need to capture professional drum sounds in your compact space. While you can’t replicate Abbey Road’s echo chambers, these techniques-proper acoustic treatment, strategic mic placement, thoughtful kit preparation, and smart recording methods-will transform your small room into a surprisingly capable recording environment. I’ve seen countless great records made in bedrooms and basements. Your space’s limitations might just become its greatest creative strengths. Investing in the best studio microphone can elevate your drum recordings to a whole new level, capturing the nuances and dynamics that breath life into your tracks. Additionally, experimenting with various mic types and placements can yield unique tonal qualities that often aren’t achievable in larger studios. Embrace your creative space, and remember that the right equipment, combined with your creativity, can lead to professional-sounding results.