Multi-Track Drum Recording in Small Spaces
You can capture professional multi-track drum recordings in small spaces by using minimal mic setups—typically three to five dynamic microphones with cardioid patterns to reduce room reflections and bleed. Focus on the Recorderman technique, maintaining equal distances between overhead mics and your snare drum to prevent phase cancellation, while positioning your kit away from walls and treating primary reflection points with absorption panels. The secrets to consistently stellar results lie in understanding how proper acoustic control transforms cramped quarters into surprisingly capable recording environments.
We are supported by our audience. When you purchase through links on our site, we may earn an affiliate commission, at no extra cost for you. Learn more.
Notable Insights
- Use dynamic microphones with cardioid patterns to reduce room reflections and maintain clarity in confined spaces.
- Keep microphone setups minimal (3-5 mics) using techniques like Recorderman to avoid phase cancellation issues.
- Position drums away from walls and treat primary reflection points with absorption panels and bass traps.
- Maintain equal distances between overhead mics and snare drum to prevent phase problems in tight recordings.
- Apply gentle compression and cautious reverb enhancement during post-processing to create depth without muddiness.
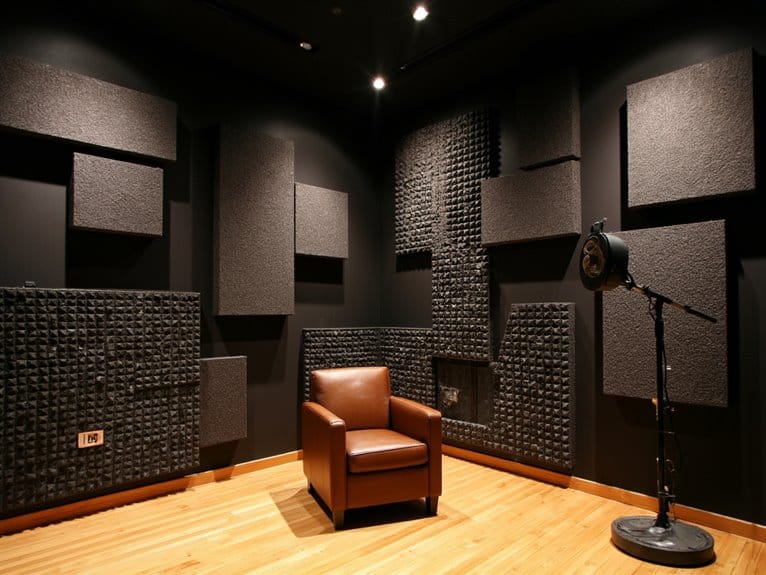
Acoustic Treatment and Room Control Strategies
When you’re setting up a drum recording space in your home studio or garage, the room acoustics will make or break your recordings, and I’ve learned this lesson the hard way after countless sessions that sounded like they were recorded inside a metal trash can.
Your primary goal should be controlling sound reflections through strategic placement of absorption panels, bass traps, and diffusers, which I’ve found work best when distributed evenly rather than clustered together.
Focus on treating primary reflection points on walls and ceilings, position bass traps in corners to eliminate standing waves, and hang acoustic clouds above your kit to prevent ceiling bounce-back that’ll muddy your overhead mics. Remember that drum placement and orientation within the room can dramatically affect your sound quality, so experiment with different positions before committing to your final setup. You don’t need to break the bank on professional acoustic treatment since heavy curtains, rugs, and even strategically placed bookshelves can significantly improve your room’s sound quality.
Selecting the Right Microphones for Confined Spaces
After you’ve tamed your room’s acoustics as much as possible, your microphone selection becomes the next critical factor in capturing professional drum sounds within the limitations of a confined space.
I’ve discovered that the wrong mic choices can amplify every acoustic flaw you thought you’d solved. Dynamic microphones excel here because their reduced microphone sensitivity naturally rejects room reflections while handling high SPL levels from close drum sources.
I’ve found that keeping your setup minimal—three to five mics maximum—prevents phase cancellation issues that plague cramped spaces. The SM57 microphone provides excellent results when recording through unconventional setups, including the creative technique of using garden hose surrounds to focus specifically on kick, snare, and tom sounds.
Boundary microphones offer an interesting solution, actually exploiting your spatial acoustics by using wall reflections constructively rather than fighting them, though placement requires careful experimentation to avoid overwhelming room tone. For kick drums specifically, look for microphones with at least 140 dB SPL handling capability to prevent distortion when recording in close proximity. Cardioid patterns are particularly effective in small spaces as they reduce bleed between drums and help maintain clarity by focusing on specific sound sources rather than picking up unwanted room reflections. Consider that hardware stability considerations also impact your recording quality, as vibrations from poorly secured stands can transfer unwanted resonance through your microphone setup.
Optimal Microphone Placement and Distance Techniques
When you’re setting up overhead mics in your confined studio space, you’ll need to master three critical placement techniques that can make or break your drum sound’s phase coherence and stereo imaging.
I’ve found that maintaining equal distances between your overhead mics and the snare drum prevents those nasty phase cancellations that’ll hollow out your mix, while positioning those overheads specifically to capture your cymbals’ sweet spot creates that wide, punchy stereo image you’re after. Close positioning of microphones enhances sound clarity, so consider how your overhead placement affects the overall drum kit capture.
The Recorderman technique‘s string measurement method might seem old-school, but it’s honestly one of the most reliable ways to guarantee your two-mic setup delivers professional results without the guesswork. Understanding proximity effect can help you achieve warmer low-frequency response when positioning mics closer to drum elements.
For optimal snare capture in your overhead array, consider incorporating a dedicated snare mic with a cardioid pattern to minimize cymbal bleed while maintaining the punch and clarity of your snare hits.
Equal Distance Phase Control
Phase relationships between microphones can make or break your drum recording, and I’ve learned this lesson the hard way after countless sessions where great performances turned into hollow, weak-sounding disasters.
When you’re working with limited space, maintaining phase coherence becomes even more critical since you can’t rely on distance to separate conflicting signals. I always measure from each microphone’s diaphragm to the snare drum center, ensuring every mic captures sound waves at identical timing.
The Glyn Johns technique exemplifies this perfectly, positioning overhead mics equidistantly while adjusting microphone angles for ideal tone capture. Using tape measures or laser tools, you’ll eliminate destructive interference that creates comb filtering, preserving your drum kit’s natural punch and clarity despite cramped recording conditions. Select microphones with cardioid patterns to enhance sound isolation and effectively reject ambient noise from your cramped recording environment.
For optimal results, ensure your stereo pair matching maintains sensitivity deviations of no greater than ±0.5 dB to avoid phase issues that can compromise your carefully controlled microphone positioning. Achieving professional-grade recordings requires maintaining a minimum 80 dB signal-to-noise ratio to ensure crystal-clear capture of subtle drum dynamics and transients.
Cymbal-Focused Overhead Positioning
Once you’ve mastered phase relationships between microphones, the next challenge becomes positioning your overheads to capture cymbals with maximum clarity and shimmer, especially when you’re working in cramped quarters where every placement decision carries amplified consequences.
I’ve found that placing cardioid condensers one to three feet above cymbals, targeting their edges rather than centers, delivers ideal cymbal control without excessive tom bleed.
Your overhead angles should point directly at cymbal surfaces, with that classic 90-degree stereo spread slightly narrowed in tight rooms to prevent unwanted reflections.
Position each mic equidistant from your main cymbals, adjusting height incrementally until you find that sweet spot where attack cuts through clearly while sustain remains musical, not washy.
Understanding polar patterns is critical for achieving optimal mic placement and sound quality, as cardioid patterns focus on sound from the front while minimizing background noise from other kit pieces.
Recorderman String Measurement Method
Though overhead positioning gives you solid cymbal control, the Recorderman technique shifts your focus toward achieving perfect phase coherence through precise measurement, transforming what’s often guesswork into exact science.
You’ll need string or cable as your primary measurement tools, creating a foolproof method for equidistant mic placement that eliminates phase cancellation while centering your snare drum perfectly in the stereo field.
Here’s your step-by-step approach to nail the positioning:
- Tape string ends to your snare and kick drum centers as reference points
- Pinch the string above your snare, creating equal string tension to both drums
- Arc that pinched point toward the drummer’s right shoulder for your second mic
- Verify both microphones maintain identical distances using your measurement tools throughout adjustment
Similar to how modeling amps require careful consideration of power output based on your venue size, your microphone positioning must match your room’s acoustic characteristics and recording goals.
When recording drums in tight quarters, consider how drum machines can supplement your acoustic recordings by providing consistent timing references and additional layers that complement your carefully positioned microphones.
For professional drum recording setups, ensure your audio interface provides zero-latency monitoring to maintain timing precision while tracking multiple microphones simultaneously.
Drummer Performance Adjustments for Small Rooms
When you’re recording drums in a small room, I’ve learned that the biggest mistake most drummers make is playing exactly the same way they’d in a large, professionally treated studio.
Your dynamic adjustments become absolutely critical in confined spaces, where hitting hard creates thin, harsh sounds that’ll make your cymbals sound like garbage.
I’ve found that performance nuances matter more than raw power—controlled stick techniques and softer velocity produce balanced tones that actually complement your room’s acoustic limitations.
You’ll want to position yourself away from walls, tune for articulation rather than resonance, and play “to the room” by moderating your projection toward reflective surfaces, ensuring your kit breathes properly without choking the natural drum tone.
Additionally, the shell material of your snare drum significantly impacts how it responds in tight recording spaces, with birch shells producing sharper articulation that cuts through reflective surfaces better than warmer poplar or brass alternatives.
Post-Recording Processing and Enhancement Methods
Once you’ve captured your drum tracks in a small room, the real magic happens during post-processing, where compression becomes your primary tool for controlling dynamics and adding punch to individual elements like kick and snare.
I’ve found that applying reverb enhancement strategically can transform a cramped recording space into something that sounds much larger and more professional, though you’ll want to use it sparingly to avoid muddying your mix. When monitoring these reverb adjustments, ensure your headphones provide effective isolation to maintain focus during critical listening sessions.
Spatial processing techniques, including careful stereo imaging and room simulation, will help you create the illusion of depth and width that your small recording environment simply couldn’t provide naturally. Quality DSP capabilities during post-processing help mitigate noise and distortion while enhancing the warm clarity of your drum recordings.
Professional audio interfaces with 24-bit/192 kHz resolution and high dynamic ranges exceeding 110 dB ensure your drum recordings maintain clarity and detail throughout the post-processing chain.
Compression and Reverb Enhancement
After you’ve captured your drum tracks in a less-than-ideal room, compression and reverb become your primary tools for transforming raw recordings into polished, professional-sounding drums that sit perfectly in your mix.
Start with serial compression techniques using gentle 2:1 ratios and 1-2 dB gain reduction, which I’ve found yields more transparent results than heavy single-stage compression. Apply parallel compression to your drum bus, blending heavily compressed signals with dry tracks to maintain transient punch while adding sustain and body.
For reverb types, plate and room algorithms work exceptionally well after compression, creating natural space without amplifying bleed. Use auxiliary sends rather than inserts to preserve your dry signal dynamics and allow flexible blend control. When recording guitar parts alongside your drums, consider how true bypass circuitry in your effects pedals maintains signal integrity throughout your entire recording chain.
Consider integrating a DI output from your bass preamp pedal when recording the bass along with drums, as this maintains signal clarity and reduces the need for additional equipment during the recording process. Ensure your signal path utilizes oxygen-free copper conductors for clean transmission from your instruments to recording interface, minimizing noise interference that could compromise your carefully crafted drum sounds.
- Gate individual tracks before compression to eliminate unwanted room noise and bleed
- Set attack times slower to preserve transient punch, faster to soften aggressive hits
- Apply short, controlled reverbs that maintain clarity in multi-miked setups
- Adjust threshold levels carefully to avoid pumping effects on your drum bus
Spatial Processing Techniques
While compression and reverb handle the fundamental sound shaping, spatial processing techniques become your secret weapon for creating width, depth, and dimensional presence that transforms cramped drum recordings into expansive, professional-sounding performances.
Mid-Side processing offers dynamic stereo manipulation by separating center and side information, allowing you to widen or narrow your stereo field without affecting mono compatibility. I’ve found that subtle delay-based techniques, like the Haas effect, create convincing spatial separation through short channel delays.
Phase alignment corrections sharpen your stereo imaging while preventing those annoying mono compatibility issues. These spatial optimization techniques, combined with selective EQ of side signals, reduce frequency masking and improve clarity, making your small-room recordings sound surprisingly three-dimensional and professionally spacious.
Minimal Setup Configurations That Work
Three fundamental microphone configurations can transform your cramped home studio into a surprisingly effective drum recording space, and I’ve found that starting with the absolute minimum often produces better results than cramming in every mic you own.
The beauty of minimal setups lies in their simplicity and phase coherence, which becomes essential when you’re working with effective mic preamps and portable recording solutions in tight quarters.
- Two-Mic Setup: Single overhead (or XY pair) plus kick mic captures surprising fullness and punch
- Three-Mic Configuration: Overhead, kick, and snare mics provide excellent balance for most musical styles
- Four-Mic Recorderman: Two overheads with snare and kick close-mics, maintaining precise distance ratios for phase alignment
- Mono Overhead Approach: Single overhead with kick mic works exceptionally well in 10×10 foot spaces
Measuring and Maintaining Consistent Results
Once you’ve nailed down your minimal mic setup, the real challenge isn’t capturing great drum sounds—it’s capturing them consistently, session after session. I’ve learned this lesson the hard way after countless hours of chasing that “perfect take” from last week that I couldn’t recreate.
Measuring mic distance becomes absolutely critical here, because even a few inches can destroy your phase coherence between overhead mics and close mics. I’ve started using measurement tools like drumsticks or laser rangefinders to mark exact positions, documenting everything with photos and distance notes.
Environmental factors matter too—recording conditions like room temperature and humidity affect sound propagation more than you’d think, so I try maintaining similar session times whenever possible.
Frequently Asked Questions
What’s the Minimum Ceiling Height Needed for Effective Overhead Microphone Placement?
You’ll need at least 10 feet for effective drum overheads placement, though 12-15 feet is ideal. Space considerations include avoiding early reflections and frequency cancellations that occur with lower ceilings affecting sound quality.
How Do You Prevent Drum Bleed Into Vocal or Instrument Mics Nearby?
You’ll prevent drum bleed by using strategic drum placement with physical separation, directional mic techniques positioned away from kit sources, gobos between instruments, and applying noise gates during recording sessions.
Can You Successfully Record Drums and Bass Simultaneously in Small Spaces?
Yes, you can record drums and bass simultaneously in small spaces. Focus on strategic drum mic placement using directional patterns and achieve bass isolation through DI recording or gobos to minimize bleed between instruments.
On a final note
You’ve now got the tools to capture professional drum sounds in your cramped home studio, and honestly, you don’t need a cathedral-sized room to make it happen. Focus on strategic mic placement, treat those nasty reflections with whatever materials you can afford, and remember that your drummer’s technique matters more than expensive gear. With consistent monitoring and smart processing, you’ll achieve surprisingly competitive results that’ll make your neighbors question their life choices.