Microphone Placement for Drum Recording
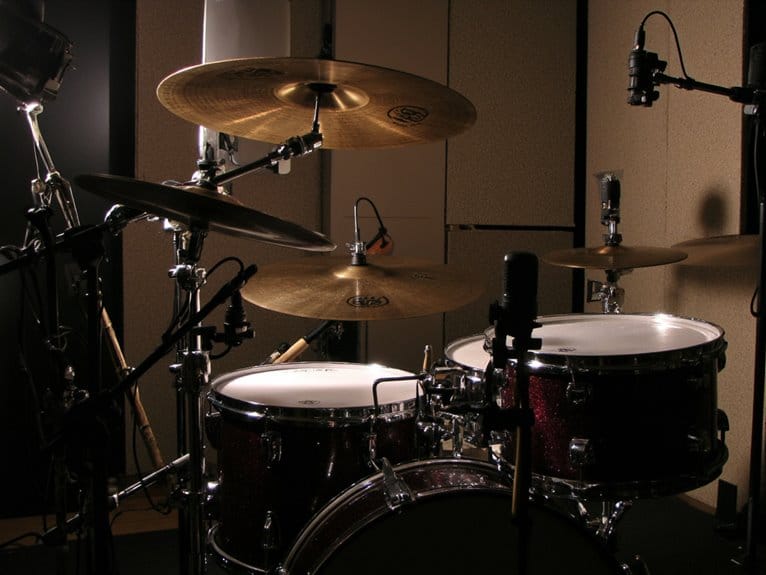
You’ll achieve professional drum recordings by positioning close mics 1-3 inches above your snare and kick drums for clarity, while placing overhead mics equidistant from the snare to maintain phase coherence. Dynamic mics handle the high SPL from drums, though condensers capture more detail for overheads. The Recorderman technique uses two cardioid mics positioned strategically above the snare and drummer’s shoulder, ensuring equal distances for phase alignment. Mastering these fundamentals opens doors to advanced ambient capture techniques.
We are supported by our audience. When you purchase through links on our site, we may earn an affiliate commission, at no extra cost for you. Learn more.
Notable Insights
- Position snare mics 1-3 inches above the rim, kick mics inside the drum away from air movement to reduce boom and plosives.
- Use overhead mics at equal distances from the snare drum to maintain phase coherence and capture cymbals with ambient sound.
- Apply the Recorderman technique with two cardioid mics equidistant from snare and kick for natural stereo imaging and phase alignment.
- Place room mics 6-10 feet from the kit facing away to emphasize natural decay and add atmospheric depth to recordings.
- Monitor continuously for phase issues between close and overhead mics, adjusting distances and angles to eliminate bleed and improve clarity.
Essential Principles for Optimal Drum Mic Positioning
Precision in microphone placement forms the cornerstone of professional drum recording, where even small adjustments can dramatically transform your sound from muddy chaos to crystal-clear definition.
I’ve learned that understanding distance relationships between mics prevents phase cancellation, which can hollow out your drum sound faster than you’d expect. You’ll want to position overhead mics 30-60 inches above the snare, adjusting height based on your room’s acoustic treatment and ceiling dimensions.
Different microphone types serve specific purposes: dynamic mics handle high SPL kick drums, while condensers capture overhead nuances beautifully. Cardioid patterns effectively reduce bleed between drums, maintaining clarity in both live and studio environments by focusing on specific sound sources.
Close-mic your snare 1-3 inches above the rim, angling toward center for ideal attack and body balance, while maintaining consistent positioning relative to other mics for phase coherence. When positioning snare mics, always aim microphones away from hi-hat to minimize bleed and maintain cleaner drum separation. For hi-hat recording specifically, position microphones 6-12 inches above the cymbals and angle them toward the hi-hat to emphasize tone while controlling harsh transients. The XY technique guarantees mono compatibility by placing capsules close together, ensuring sound waves reach both microphones simultaneously.
Professional snare drum microphones should handle sound pressure levels exceeding 160 dB to prevent distortion and maintain clarity during dynamic performances.
The Recorderman Technique: Two-Mic Setup for Small Spaces
When you’re working in cramped studios or home recording setups, the Recorderman technique offers an elegant solution that I’ve found delivers surprisingly full drum sounds using just two carefully positioned microphones. This approach emphasizes phase coherence through precise measurement, placing both cardioid mics equidistant from your snare and kick centers to achieve exceptional drum sound clarity.
Here’s my proven setup process:
- Position the first mic directly above your snare drum, approximately two drumstick lengths high, pointing straight down.
- Place the second mic above the drummer’s right shoulder, angled toward the snare center and kick beater impact point.
- Measure distances using string or cable to verify both mics are equidistant from snare and kick centers.
- Monitor phase relationships in mono to confirm proper alignment.
The two mic advantages include minimal setup time and remarkable stereo imaging. This simplified approach also reduces phase issues commonly encountered with complex multi-microphone arrangements, resulting in punchier audio that captures the natural drum sound more effectively. Cardioid patterns are ideal for this technique as they focus on the drumhead while rejecting external noise from cymbals and other instruments. When selecting microphones for this technique, ensure they can handle sound pressure levels exceeding 160 dB to maintain clarity during aggressive playing styles. For optimal results, position microphones 2-4 inches from drum surfaces to capture both attack and body while maintaining proper phase relationships.
Glyn Johns Method: Natural Sound With Minimal Equipment
When you’re working with the Glyn Johns method, your success hinges on creating that vital triangular geometry where both overhead mics maintain exactly the same distance from your snare drum, eliminating phase cancellation that’ll otherwise make your drums sound thin and lifeless.
You’ll position one overhead several feet above looking down at the snare, while placing the second mic near your floor tom to capture that essential ambient room sound that gives this technique its legendary punch.
I’ve found that careful listening during setup becomes absolutely important here, since even small positioning changes will dramatically affect your drum image, and achieving proper phase consistency requires patience rather than rushing through the mic placement process.
Equidistant Mic Positioning Setup
The equidistant mic positioning setup, better known as the Glyn Johns Method, represents one of recording’s most elegant solutions for capturing drums with minimal equipment while achieving maximum impact.
You’ll accomplish proper tonal balance through strategic mic selection and precise distance measurements that eliminate phase cancellation issues.
Here’s your essential setup checklist:
- Primary overhead: Position 40-60 inches directly above snare, pointing straight down
- Secondary overhead: Place 6 inches above floor tom, angled toward snare and hi-hat
- Distance measurement: Verify both overheads are equidistant from snare center
- Support mics: Add close snare and kick mics for clarity and low-end foundation
This technique’s genius lies in its simplicity—you’re capturing the kit’s natural acoustics while maintaining phase coherence that preserves punch and stereo imaging.
The cardioid patterns of your overhead microphones will help isolate drum elements and reduce unwanted bleed from other instruments in the room.
Overhead and Floor Placement
Now that you’ve grasped the distance relationships, let’s examine how the overhead and floor mic placements work together to create the Glyn Johns Method‘s signature sound.
Your overhead microphone sits 40 to 60 inches above the snare drum, pointing straight down to capture the kit’s natural ambient perspective, balancing snare crack with cymbal shimmer and tom resonance.
Meanwhile, your floor microphone positions at the 3 o’clock spot near the floor tom, angled to grab those vital low-mid frequencies that add depth and punch without isolating individual drums.
These two mics form the foundation of your drum sound, with the overhead delivering spacious ambience while the floor mic contributes essential body and fullness to complement the close-miked kick and snare elements.
Phase Consistency Through Listening
How do you make certain those carefully positioned microphones actually work together instead of fighting each other? Through careful listening techniques and strategic tonal adjustments, you’ll develop the ear to detect phase issues before they ruin your recording.
I’ve learned that phase problems often reveal themselves as a hollow, weak snare sound or cymbals that seem to disappear in the mix.
Your listening approach should include these critical steps:
- Solo each microphone individually to establish baseline tonal characteristics and identify any obvious frequency imbalances.
- Combine overhead and side mics first while monitoring for phase cancellation that creates thin, lifeless drum sounds.
- Add the kick mic gradually while checking that low-end punch remains intact without muddiness.
- Invert phase on one mic temporarily to confirm you’ve achieved ideal coherence.
Many drummers who record at home use practice amplifiers with headphone outputs to monitor their playing while tracking, which helps maintain consistent timing without bleed into the drum microphones.
Stereo Overhead Miking Strategies
When you’re setting up stereo overhead mics, your height and angle adjustments will dramatically shape whether you capture that tight, punchy drum sound or a more spacious, room-drenched vibe that breathes with natural ambience.
Your panning decisions and stereo spread choices determine if listeners experience a narrow, focused kit that sits politely in the mix, or a wide, enveloping drum sound that stretches across the entire soundstage like it’s wrapping around their ears.
Balancing room sound becomes your secret weapon for creating depth, since you can dial in just enough natural reverb to make the drums feel alive without turning your tight recording into a muddy mess that fights every other instrument.
Height and Angle Adjustments
The precise positioning of overhead microphones through careful height and angle adjustments forms the backbone of professional drum recording, determining whether you’ll capture a cohesive, punchy kit sound or end up wrestling with phase issues and unbalanced stereo imaging that’ll haunt your mix.
Your overhead height directly impacts the balance between cymbal detail and overall kit balance, while angle adjustments control stereo width and sound capture quality.
Here’s what you need to nail for ideal mic placement:
- Height Range: Position mics 2-4 feet above cymbals, balancing detail with spatial context
- Equidistant Placement: Measure exact distances from snare to maintain phase coherence
- Angle Orientation: Point capsules toward kit center, not straight down
- Consistent Symmetry: Match heights and angles on both sides for balanced stereo imaging
Panning and Stereo Spread
Once you’ve dialed in your overhead height and angles, your stereo imaging strategy becomes the make-or-break factor that’ll either give you that wide, immersive drum sound you’re chasing or leave you with a muddy mess that sounds like it’s coming from inside a cardboard box.
Your panning techniques directly impact how drums translate across different playback systems, with hard left-right panning delivering maximum stereo separation while softer positioning maintains better mono compatibility.
Achieving proper stereo balance requires centering your kick and snare while allowing cymbals and toms to breathe across the stereo field.
I’ve learned that dynamic panning adjustments during mixing can rescue off-center elements, particularly when using spaced pair configurations where the snare might drift from center, giving you creative control over your final drum image.
Room Sound Balance
While your panning strategy sets the foundation for stereo imaging, the real magic happens when you nail the delicate balance between direct drum sound and room ambience through strategic overhead microphone placement.
Your miking distance and height dramatically affect how much room reflections you’ll capture. Lower OH mics pointed at the kit center give you a drier, more controlled sound, while higher placement angled outward embraces the room’s natural character.
Here’s how different stereo techniques shape your room balance:
- XY/Coincident pairs minimize room sound with tight capsule spacing and excellent mono compatibility.
- Spaced pairs capture wider stereo imaging and more ambience but require careful phase management.
- ORTF/Blumlein configurations balance direct sound with natural room presence through strategic angling.
- Glyn Johns technique delivers controlled room sound with focused stereo imaging.
Capturing Room Ambience With Strategic Placement
Room ambience transforms sterile drum recordings into living, breathing performances, and I’ve found that strategic microphone placement makes all the difference between capturing authentic space versus lifeless direct sound.
When selecting ambient mic types, large-diaphragm condensers excel at capturing detailed room reflections, while ribbon mics add warmth to naturally decaying sound.
For reflection optimization, position your mics where room reflections equal direct drum sound—typically 6-10 feet from the kit at heights ranging from 3-6 feet.
I’ll place mics facing away from drums toward corners or hallways to emphasize natural decay, though you’ll need to experiment since every room’s acoustics differ.
Distance and angle adjustments help balance stereo imaging while avoiding phase issues that muddy your mix.
Close Miking the Kick Drum for Maximum Impact
Although room ambience creates the foundation for natural drum sound, the kick drum’s close-miked signal provides the punch and definition that cuts through dense mixes.
I’ve learned that precise microphone placement inside or near the resonator head determines whether you’ll capture a thunderous low-end thump or a tight, attacky presence that drives the entire rhythm section.
Your dynamic microphone selection should prioritize tight cardioid patterns and high SPL handling, while kick drum placement requires careful consideration of these critical factors:
- Position the mic just inside the hole to reduce excessive boom while maintaining punchy attack
- Angle away from direct air movement to minimize wind noise and plosives from compressed air
- Point slightly off-center to capture more body resonance than direct beater impact
- Experiment with height adjustments inside the shell to control attack prominence versus low-end response
Professional kick drum recording demands microphones capable of handling 130 dB SPL or higher without distortion, ensuring clean capture during the most powerful drum hits. Dynamic microphones with supercardioid patterns excel at providing enhanced isolation from unwanted noise while capturing the focused sound sources you need for punchy kick drum recordings. Strategic positioning near the kick drum improves the signal-to-noise ratio by maximizing the direct sound capture while minimizing unwanted room interference.
Snare Drum Miking: Top and Bottom Placement Techniques
Two microphones working in tandem capture the snare drum’s complete sonic signature more effectively than any single placement can achieve.
I’ve discovered that mastering both top and bottom miking techniques transforms a decent snare sound into the backbone that anchors your entire mix.
For top mic positioning, start 5 cm above the rim, 3-5 cm over the head, angling between center and edge for balanced tone. Moving closer to the rim emphasizes brilliance, while positioning near the head enhances punch and lower frequencies.
Bottom mic techniques focus on capturing snare wire crispness by placing the microphone several centimeters below the bottom head, angled upward.
You’ll need careful phase alignment when combining both signals, but this dual approach delivers the snap, definition, and natural resonance that makes snares cut through dense mixes.
Frequently Asked Questions
What Microphone Types Work Best for Different Drum Recording Scenarios?
You’ll want dynamic microphones for close-miking snares and kicks due to their SPL handling. Ribbon microphones excel as drum overheads, providing warm, natural sound. Condensers work best for detailed tom captures and transparent overhead recordings.
How Do I Prevent Bleed Between Drum Mics in a Small Recording Space?
You’ll minimize bleed through strategic mic positioning using directional patterns and close placement. Add acoustic treatment like gobos between drums and absorptive materials on walls to control reflections in your small space.
Should I Use Compression During Recording or Only During Mixing Drums?
You should use light compression during recording for character, then apply detailed compression techniques during mixing. In small recording environments, track compression can amplify bleed, so prioritize mixing compression for flexibility.
How Do I Match Microphone Levels When Using Multiple Drum Mics?
You’ll balance drum mic levels through careful mic preamp settings for each channel, using level adjustment techniques like gain staging and visual metering. Set individual preamp gains to avoid clipping while maintaining consistent signal strength across all mics.
On a final note
You’ve now got the essential mic placement techniques that’ll transform your drum recordings, whether you’re working with a single overhead or a full multi-mic setup. Remember, there’s no absolute right or wrong approach—what matters is how these techniques serve your specific sound goals. Start with the basics, trust your ears, and don’t be afraid to experiment. Your drums will thank you for it.


