Kick Drums and Pedals: Power and Precision Fundamentals
You’ll master kick drum fundamentals by targeting the 50-100 Hz range for essential thump while choosing between chain-drive pedals for balanced feel or direct-drive for faster response. I’ve found that cutting 200-400 Hz reduces muddiness, while gentle compression around 4:1 ratio maintains punch without squashing impact. Your beater material—felt, wood, or plastic—dramatically affects attack characteristics, and proper spring tension optimization differs between studio control and live power projection, though understanding frequency management and pedal mechanics together reveals your true sonic potential.
We are supported by our audience. When you purchase through links on our site, we may earn an affiliate commission, at no extra cost for you. Learn more.
Notable Insights
- Kick drum fundamentals center on 50-100 Hz for thump, with high-pass filtering below 40 Hz removing unwanted rumble.
- Chain-drive pedals provide balanced feel while direct-drive pedals offer faster response for precision playing techniques.
- Beater material significantly affects tone: felt produces warm attack, wood creates punchy impact, plastic delivers sharp click.
- Spring tension adjustments optimize performance: tighter springs for studio control, looser springs for live power projection.
- Acoustic kicks require reactive mixing with compression, while synthesized kicks allow proactive control over frequency shaping.
Anatomy of Kick Drum Sound Design
The foundation of any compelling kick drum lies in understanding its sonic architecture, where each frequency range contributes a distinct element to the overall character and impact.
Your kick drum frequency spectrum breaks down into four essential zones: the fundamental 50-100 Hz range provides that essential thump and physical weight, while the 100-600 Hz midrange adds body but requires careful management to avoid muddiness.
I’ve found that transient design becomes vital in the attack phase, where sharp amplitude envelopes and pitch modulation create the punch that differentiates your kick from mere low-end rumble. Using a high-pass filter to remove unwanted sub bass below 40 Hz prevents boomy artifacts and tightens the overall low-end response.
Professional kick design typically starts with a sine wave foundation that’s shaped by pitch envelopes and enhanced with controlled distortion for texture and character. When working with electronic drums, pad sensitivity levels allow for detecting subtle dynamic variations that can dramatically affect the kick drum’s response and character in your mix.
Finally, subtle high-frequency content adds clarity and presence, ensuring your kick cuts through busy mixes while maintaining its foundational power across different playback systems.
Essential Mixing Techniques for Maximum Impact
Once you’ve established your kick drum’s sonic architecture, effective mixing becomes the bridge between raw potential and professional impact, where strategic EQ decisions, compression techniques, and spatial considerations transform your foundational element into a driving force that anchors the entire production.
Your kick clarity starts with removing rumble below 30 Hz while boosting the fundamental frequency between 50-100 Hz for body. Dynamic shaping through compression requires 20-40 ms attack times to preserve transients, and EQ strategies should emphasize 2-5 kHz for beater click while cutting 200-400 Hz boxiness.
| Frequency Range | EQ Technique | Purpose |
|---|---|---|
| Below 30 Hz | High-pass filter | Remove rumble |
| 50-100 Hz | Gentle boost | Enhance body |
| 200-400 Hz | Subtle cut | Reduce boxiness |
| 2-5 kHz | Presence boost | Add attack |
| Above 8 kHz | Shelving EQ | Increase air |
Layering methods, impact enhancement through parallel compression, and resonance control complete your punchy sounds arsenal for maximum presence boosting and tonal enhancement. Maintaining the low-end content in your overhead microphones proves critical for proper drum sound augmentation rather than aggressive filtering that strips away essential frequency support.
Acoustic vs. Synthesized Kick Drums
When you’re choosing between acoustic and synthesized kick drums, you’ll encounter fundamentally different sound sources that each offer distinct advantages in your mixing workflow.
Acoustic kicks provide natural resonance and organic character through physical drum shells, while synthesized kicks deliver precise electronic control over every sonic parameter, giving you vastly different starting points for tonal manipulation.
I’ve found that understanding these core differences in sound generation, mixing flexibility, and frequency shaping capabilities will help you make informed decisions about which approach best serves your musical goals.
Sound Source Characteristics
Understanding kick drum sound sources fundamentally shapes your entire production approach, as the choice between acoustic and synthesized drums determines not just the sonic character but also the technical workflow you’ll navigate throughout your project.
| Characteristic | Acoustic Kicks | Synthesized Kicks |
|---|---|---|
| Physical Attributes | Drum skin, shell resonance, beater interaction | Oscillators, filters, controlled parameters |
| Sound Variations | Natural inconsistencies, room acoustics | Precise repeatability, engineered consistency |
| Transient Characteristics | Soft, rounded attack from drumhead contact | Sharp, controllable transients via oscillator manipulation |
| Frequency Focus | Mid-low fundamentals with complex overtones | Sub-bass emphasis (20-100 Hz) with tight control |
| Genre Suitability | Jazz, Hip-Hop, Latin requiring acoustic warmth | EDM, techno demanding electronic clarity |
Your performance dynamics will vary dramatically—acoustic drums offer human nuances while synthesized versions provide control precision, making layering techniques essential for blending natural tone with electronic punch. The choice between felt beaters for warm tones or plastic beaters for aggressive attack significantly influences the acoustic kick drum’s tonal characteristics depending on your musical style. When recording acoustic kick drums, selecting the right microphone becomes crucial, as dynamic microphones excel in high sound pressure environments and provide the durability needed for capturing powerful kick drum transients without distortion. For optimal recording results, maintaining proper microphone distance ensures balanced capture of the kick drum’s fundamental frequencies while avoiding proximity effects that can muddy the low-end response.
Mixing Control Differences
While acoustic and synthesized kick drums may serve the same rhythmic foundation in your mix, the control approaches you’ll need differ so dramatically that they’re practically different instruments requiring distinct mixing philosophies.
I’ve found that acoustic nuances demand reactive mixing—you’re constantly managing unpredictable room reflections, phase alignment between multiple mics, and dynamic inconsistencies that vary with each performance, requiring heavy compression and careful frequency carving to achieve mix consistency.
Sound synthesis flips this script entirely, offering proactive control where you’ll shape envelope parameters, utilize precise frequency targeting without phase concerns, and maintain inherent dynamic control.
Sample augmentation bridges both worlds effectively, letting you layer synthesized elements with acoustic sources for enhanced tonal clarity while preserving natural character through strategic kick drum layering techniques.
Tonal Shaping Methods
Before I discovered how dramatically different tonal shaping approaches work between acoustic and synthesized kick drums, I’d assumed that achieving professional results meant applying similar EQ curves and processing techniques to both—a misconception that cost me countless hours of frustrated mixing sessions.
Acoustic kicks derive their character from physical shell resonance and beater impact, creating organic harmonics that respond beautifully to careful mic placement and room acoustics. You’ll find their natural transients softer yet more complex than synthesized alternatives.
Synthesized kicks, however, rely on oscillator waveforms and precise ADSR controls to craft their fundamental thump. Modern harmonic layering techniques combine both approaches effectively, while thoughtful panning techniques separate these elements spatially.
| Aspect | Acoustic | Synthesized |
|---|---|---|
| Source | Shell resonance | Oscillator waveforms |
| Control | Tuning/damping | Parameter automation |
| Character | Organic harmonics | Precise sub-bass |
Frequency Management and EQ Strategies
When you’re mixing kick drums, the frequency spectrum becomes your roadmap to achieving that perfect balance between thunderous low-end power and crisp, cutting presence.
Understanding kick drum frequencies reveals that your fundamental low-end lives between 25-80 Hz, while punch and impact dominate the 80-200 Hz range. The notorious muddy zone lurks around 200-500 Hz, where you’ll often need to cut problematic resonances that cloud your mix.
Effective eq techniques start with a high-pass filter around 30-40 Hz to eliminate subsonic rumble, followed by strategic narrow cuts in the boxy 300-500 Hz region.
You’ll want to boost selectively around 45-200 Hz for enhanced body and punch, while applying a low-pass filter above 10 kHz removes unwanted cymbal bleed and noise.
Dynamics Processing and Envelope Shaping
Frequency shaping establishes the tonal foundation, but dynamics processing determines how your kick drum breathes and moves within the mix, controlling everything from the initial transient snap to the sustained low-end rumble that follows.
Your dynamics adjustment techniques should start with compression ratios around 4:1, using moderate attack times to preserve that essential transient punch while smoothing overall dynamics. I’ve found that gentle gain reduction of 1-3 dB often provides sufficient control without squashing the natural impact.
Effective envelope shaping strategies include:
- Attack timing preservation – longer attack times maintain transient clarity
- Release adjustment – match release to kick tail length for pumping prevention
- Multiband compression – target frequency-specific dynamics independently
- Transient shaping – manipulate attack and sustain characteristics separately from overall level
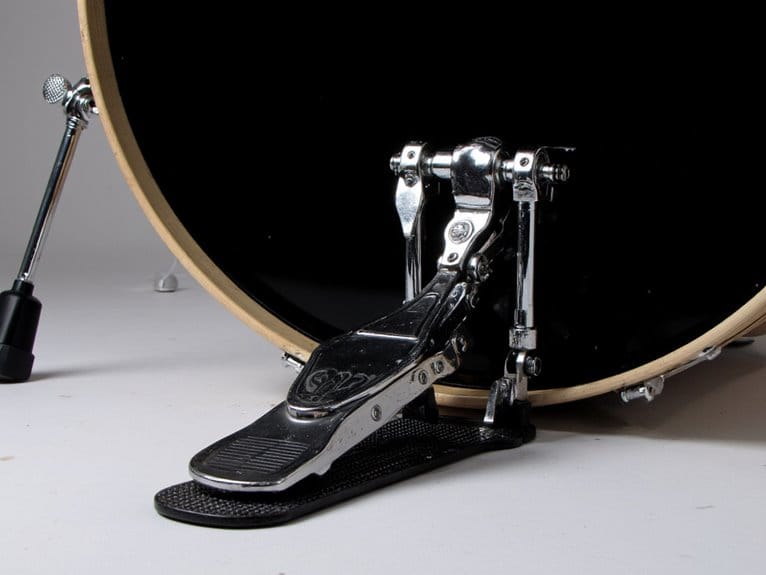
Pedal Types and Performance Characteristics
When you’re selecting a kick drum pedal, the drive mechanism fundamentally shapes your playing experience. Chain-drive pedals offer that familiar balanced feel most drummers know, while direct-drive systems provide the lightning-fast response that metal players crave for their double-bass marathons.
I’ve found that chain drives give you more of that organic, slightly elastic feel that works beautifully for rock and pop styles, though they’ll rattle a bit more during quiet studio sessions compared to their direct-drive cousins.
Beyond the mechanical differences, your choice of beater material—whether it’s felt, wood, plastic, or those hybrid designs—dramatically affects your tone and attack, basically becoming the final link between your foot’s energy and the drum’s voice.
For double bass setups, adjustable spring tension becomes crucial for maintaining consistent response across both pedals, especially when switching between different playing intensities and musical genres.
Chain Vs Direct Drive
How dramatically can the mechanical connection between your foot and the beater affect your drumming performance? The chain versus direct drive debate centers on fundamental differences in responsiveness comparisons and performance preferences.
Chain drives use intermediary components that create slight mechanical play, offering a progressive, flexible feel that many drummers appreciate for dynamic control. Direct drives eliminate this play through solid metal linkages, delivering instantaneous response favored by speed-focused players.
Your choice impacts several practical factors:
- Responsiveness: Direct drives provide near-zero lag while chains introduce slight delay
- Feel: Chains offer natural resistance; direct drives feel linear and immediate
- Maintenance considerations: Chains require frequent cleaning; direct drives need minimal upkeep
- Cost efficiency: Chain drives typically cost less while delivering solid performance
Understanding these mechanical differences helps you match pedal characteristics to your playing style and budget requirements.
Beater Material Impact
While pedal mechanics determine how your foot motion transfers to the beater, the beater material itself shapes the fundamental character of every kick drum strike you’ll produce. Material density directly affects beater vibrations and weight distribution, with felt offering controlled rebound while plastic delivers aggressive attack characteristics.
| Material | Attack Type | Best For |
|---|---|---|
| Felt | Warm, rounded | Versatile styles |
| Plastic | Bright, cutting | Metal, loud bands |
| Wood | Punchy, controlled | Rock, fusion |
| Dual-surface | Variable | Dynamic sets |
| Specialty | Unique textures | Niche applications |
Surface texture influences tonal clarity and sound projection considerably. Felt absorbs impact energy, creating softer attacks with natural rebound control, while plastic’s harder surface maximizes cutting power for dense musical arrangements where your kick needs serious sound projection through heavy instrumentation.
Setup Optimization for Studio and Live Applications
Since I’ve spent countless hours tweaking kick drum setups in both cramped studio corners and sprawling concert stages, I can tell you that optimizing your pedal configuration isn’t just about personal preference—it’s about matching your equipment to the specific demands of each environment.
Studio adjustments prioritize control and sound isolation, requiring tighter spring tension for precise dynamic response and performance feedback. Live modifications focus on power projection, with looser springs enabling aggressive playing that cuts through stage mix.
- Studio: Medium-tight springs, felt beaters for warmth, precise pedal ergonomics for long sessions
- Live: Looser springs for speed, wood/plastic beaters for punch and projection
- Acoustic considerations: Room size affects beater distance and spring tension choices
- Setup flexibility: Quick adjustment capabilities for venue-specific acoustic demands
Frequently Asked Questions
How Much Should I Spend on My First Kick Pedal?
You should spend $60-$100 on your first kick pedal. This kick pedal budget balances affordability with quality for beginner drum gear. The Pearl P930 Demonator offers excellent value, providing versatility and durability.
Can I Use Electronic Kick Triggers With Acoustic Drum Kits?
Yes, you can use electronic kick triggers with acoustic drum kits. Different trigger types offer excellent acoustic compatibility, mounting directly onto your bass drum shell or pedal beater to blend electronic sounds with your natural acoustic tone.
What’s the Difference Between Single and Double Kick Pedals?
Single pedals use one footboard for simpler setup and groove-focused playing, while double pedals feature two connected footboards. Single pedal advantages include portability and simplicity. Double pedal techniques enable faster speeds and complex patterns.
On a final note
You’ve now got the essential toolkit for crafting kick drums that’ll cut through any mix with authority and precision. Whether you’re programming synthetic patterns, miking acoustic kits, or fine-tuning your pedal technique, these fundamentals will serve you well in countless sessions ahead. Remember, great kick drum sound isn’t just about technical knowledge—it’s about applying these principles with purpose and musical sensitivity.