How to Clean and String Your Guitar Properly
To properly clean and string your guitar, start by washing your hands and securing your instrument on a stable surface with adequate lighting. Clean the body with appropriate polish, then address the fretboard using products specific to your wood type-lemon oil for rosewood or ebony, dry cloth for maple. Remove old strings, inspect hardware for wear, and install new strings with proper winding technique, ensuring 2-3 coils for wound strings and 3-5 for unwound. Stretch strings gently and tune repeatedly during the first hour to establish stability. The thorough maintenance process involves several additional steps that’ll maximize your guitar’s performance and longevity.
We are supported by our audience. When you purchase through links on our site, we may earn an affiliate commission, at no extra cost for you. Learn more.
Notable Insights
- Wash hands thoroughly and prepare a stable, well-lit workspace with protective materials to prevent damage.
- Use appropriate cleaning products for your fretboard type: lemon oil for rosewood/ebony, dry cloth for maple.
- Clean hardware components with guitar polish and inspect tuning machines, bridge, and nut for wear or damage.
- Wind new strings properly with 2-3 coils for wound strings and 3-5 for unwound strings on tuning pegs.
- Stretch strings gently and tune repeatedly during the first hour to ensure proper settling and stability.
Essential Preparation Steps Before Cleaning and Restringing
Before you plunge into cleaning and restringing your guitar, I’ve learned through countless maintenance sessions that proper preparation makes the difference between a smooth, professional job and a frustrating experience that could potentially damage your instrument.
Your workspace setup forms the foundation of effective string maintenance, so I always start by washing my hands thoroughly to prevent transferring oils onto the guitar’s finish. Find a stable, flat surface where you can lay your guitar safely, using a neck cradle or soft cloth to protect the body and neck from scratches.
Confirm you’ve got adequate lighting and ventilation, then clear away any clutter that might cause accidental knocks or damage during the process. Many budget instruments may require minor setup adjustments during maintenance to optimize their playability and performance. If you plan to record your freshly restrung guitar, consider setting up your audio interface nearby to test the sound quality once you’ve completed the maintenance work.
Comprehensive Guitar Body and Fretboard Cleaning Techniques
Once you’ve removed the old strings and prepared your workspace, the real transformation begins with proper cleaning techniques that I’ve refined over years of maintaining guitars in various conditions.
Understanding different fretboard types determines which cleaning products you’ll need, since unfinished rosewood and ebony require different approaches than finished maple surfaces.
I’ve learned that gentle pressure with microfiber cloths prevents damage while effectively removing accumulated grime.
Here’s my essential cleaning approach:
- Use soft-bristle brushes for stubborn dirt around frets and tight corners
- Apply lemon oil only to unfinished fretboard types like rosewood and ebony
- Wipe along wood grain direction to minimize scratches and debris accumulation
- Protect electronics with masking tape before applying any moisture-based cleaning products
- Remove all residues thoroughly with dry microfiber cloths to prevent long-term damage
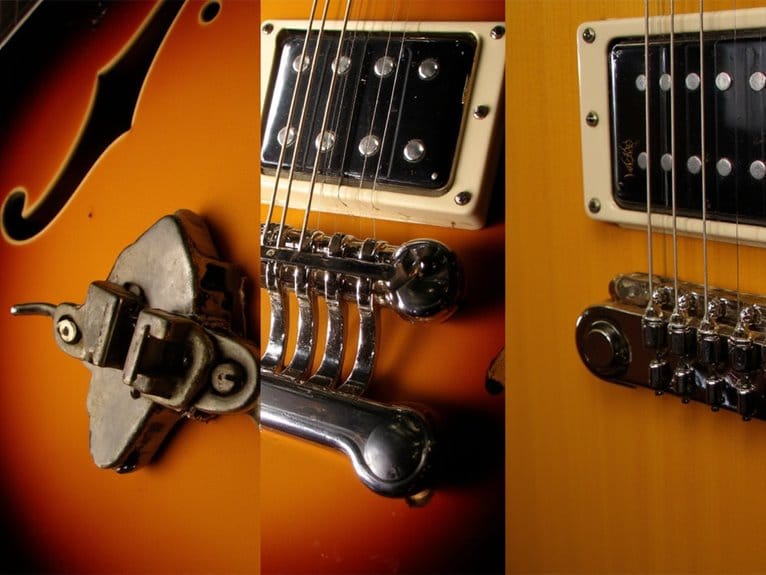
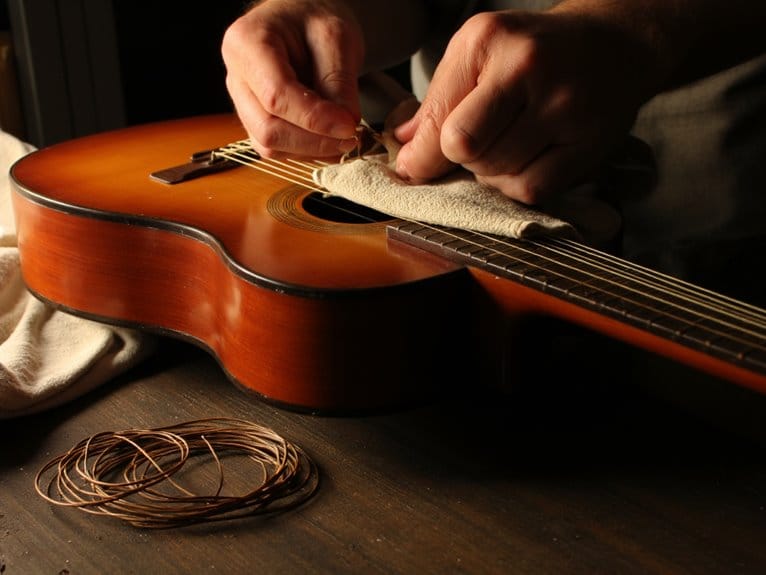
Hardware Maintenance and Proper Restringing Methods
While fretboard cleaning gets most of the attention, I’ve found that neglecting your guitar’s hardware during restringing sessions can lead to frustrating tuning instability and premature component failure that’ll cost you more than preventive maintenance ever would.
Start your hardware inspection by examining tuning machines for loose screws, checking nut and bridge slots for wear, and cleaning metal components with guitar polish to remove corrosive sweat buildup.
When restringing, I recommend using a string winder for efficiency while maintaining proper string winding technique-2-3 coils for wound strings, 3-5 for unwound strings around tuning pegs.
Clean pickup poles carefully, lubricate moving parts sparingly, and stretch new strings gently to accelerate settling, tuning repeatedly during that essential first hour.
Long-Term Care and Maintenance Best Practices
After you’ve mastered proper hardware care and restringing techniques, the difference between a guitar that’ll serve you reliably for decades versus one that becomes a frustrating money pit often comes down to consistent daily habits and environmental awareness that most players overlook until problems emerge.
Your long-term maintenance strategy should center around humidity control and dust prevention, two factors that silently destroy instruments while owners remain oblivious until irreversible damage occurs.
Two silent killers lurk in every guitarist’s home: fluctuating humidity and accumulated dust, both causing irreversible damage while you remain completely unaware.
- Maintain 40-50% humidity using room monitors and case humidifiers to prevent warping and cracking
- Store guitars in hard-shell cases with humidity control systems when not actively playing
- Clean electronics annually with specialized sprays to prevent static buildup and signal degradation
- Avoid direct sunlight and temperature fluctuations that compromise tuning stability
- Perform periodic professional setups to address internal circuitry and structural adjustments
On a final note
You’ve now mastered the essential techniques for keeping your guitar in peak condition, from thorough cleaning procedures to precise restringing methods. I’ve found that consistent maintenance, performed every few months depending on usage, dramatically extends instrument longevity while preserving ideal tone quality. Remember, you’re investing time now to avoid costly repairs later, and your guitar will reward your diligence with improved playability and sustained performance.