How to Choose the Right Studio Monitors for Your Room Size
Your room size determines your monitor choice more than you’d think, and I’ve learned that nearfield monitors with 5-inch woofers work best in spaces under 150 square feet, while rooms exceeding 300 square feet need midfield monitors with 6.5 to 8-inch drivers. You’ll want to maintain 3-5 feet listening distance for nearfields, ensuring monitor spacing doesn’t exceed one-third of your room’s average dimensions. Below, we’ll explore the positioning secrets that transform your space.
We are supported by our audience. When you purchase through links on our site, we may earn an affiliate commission, at no extra cost for you. Learn more.
Notable Insights
- Match woofer size to room volume: 5-inch drivers for rooms under 150 sq ft, 6.5-8 inch for spaces over 300 sq ft.
- Choose nearfield monitors for small-medium rooms and midfield monitors for larger spaces with controlled acoustics and longer listening distances.
- Ensure monitor spacing doesn’t exceed one-third of your room’s average dimensions for proper sound reproduction and mix translation.
- Position monitors 3-5 feet away in an equilateral triangle setup at ear level, angled 30 degrees inward for optimal imaging.
- Apply room-specific acoustic treatment: aggressive bass trapping for small rooms, balanced absorption/diffusion for medium, extensive treatment for large spaces.
Understanding Room Size and Monitor Type Compatibility
When I first started setting up studio monitors, I made the classic mistake of treating room size as an afterthought, assuming any decent speaker would work in my home studio. That assumption cost me months of frustration and questionable mix decisions.
Your room dimensions directly determine which monitor type will deliver accurate sound reproduction, making this compatibility vital for professional results.
Room dimensions and monitor compatibility aren’t optional considerations—they’re the foundation that determines whether your mixes translate professionally or fall apart completely.
Nearfield monitors excel in small to medium rooms because they’re designed for close listening distances, typically reducing problematic room interactions that plague untreated spaces. Consider whether you need 4.5″, 6″, or 8″ driver sizes based on your specific room dimensions and listening requirements.
Midfield monitors require medium to large rooms with longer listening distances, where they can leverage controlled room acoustics rather than fighting against them. Monitor spacing should follow the general rule that it not exceed one third of your room’s average dimensions to maintain effective sound judgment.
The relationship between monitor acoustic output and your space determines whether you’ll achieve proper speaker placement within that essential equilateral triangle configuration, ultimately affecting your mix translation across different playback systems. Monitors with 5-inch woofers provide better bass response compared to smaller drivers, which becomes especially important in rooms where low-frequency accuracy is critical for professional mixing decisions. Look for monitors with built-in EQ controls for bass and treble adjustments to help optimize sound for your specific room characteristics. Just as with guitar amplifiers, higher wattage in studio monitors offers better dynamic range and cleaner reproduction, particularly crucial when working in larger rooms where you need adequate volume without distortion.
Woofer Size Selection Based on Room Volume
When I’m selecting studio monitors for different room sizes, I’ve learned that matching your woofer diameter to your space’s volume is absolutely essential for achieving accurate bass reproduction without overwhelming your acoustics.
You’ll find that smaller rooms, typically under 150 square feet, work best with 5-inch woofers or smaller since they provide adequate low-frequency extension down to about 50 Hz while preventing the bass buildup that larger drivers often create in confined spaces.
Conversely, if you’re working in larger control rooms or studios exceeding 300 square feet, you’ll need 6.5 to 8-inch woofers to generate sufficient bass output and achieve that vital low-frequency extension down to 38 Hz without running into headroom limitations. Maintaining one-metre distance from walls is crucial regardless of monitor size, as this positioning helps avoid pressure maxima that can compromise your monitoring accuracy.
Small Rooms Need Smaller Woofers
As room dimensions shrink, the relationship between woofer size and acoustic performance becomes increasingly critical. I’ve found that smaller drivers consistently outperform their larger counterparts in compact spaces. The physics are straightforward: smaller rooms contain less air volume, requiring minimal movement to achieve adequate sound pressure levels, which dramatically improves woofer efficiency in these environments.
Here’s what makes smaller woofers ideal for compact studios:
- Enhanced sound coherence – Driver spacing allows ultra-nearfield placement without phase issues between woofer and tweeter
- Reduced room interference – Closer listening distances guarantee direct sound dominates over problematic wall reflections
- Proper power matching – 50-75 watts perfectly complements small drivers without overwhelming your space
Five-inch woofers typically represent the sweet spot for rooms under 150 square feet.
Large Rooms Require Bigger Drivers
The inverse relationship becomes immediately apparent when you step into spacious control rooms, where smaller woofers simply can’t displace enough air to maintain adequate sound pressure levels across the extended listening distances.
In my experience testing monitors across various studio environments, I’ve found that rooms exceeding 300-400 cubic feet demand woofers of 8 inches or larger to achieve proper bass response without strain.
The physics here aren’t negotiable—bigger drivers provide greater excursion and surface area, directly improving woofer efficiency when filling large volumes with balanced sound. Monitor systems with 12-inch woofers are particularly effective for low-frequency monitoring in expansive studio spaces, ensuring consistent bass response across extended listening distances.
You’ll also need robust amplification to support these larger drivers, ensuring clean output at higher SPLs while maintaining the dynamic range essential for professional mixing and mastering work. Professional audio setups benefit from low-noise preamps that maintain signal integrity throughout the monitoring chain.
When selecting studio monitors for large spaces, look for systems that maintain a signal-to-noise ratio exceeding +90 dB to ensure professional audio quality matches the scale of your room.
Optimal Monitor Positioning for Different Spaces
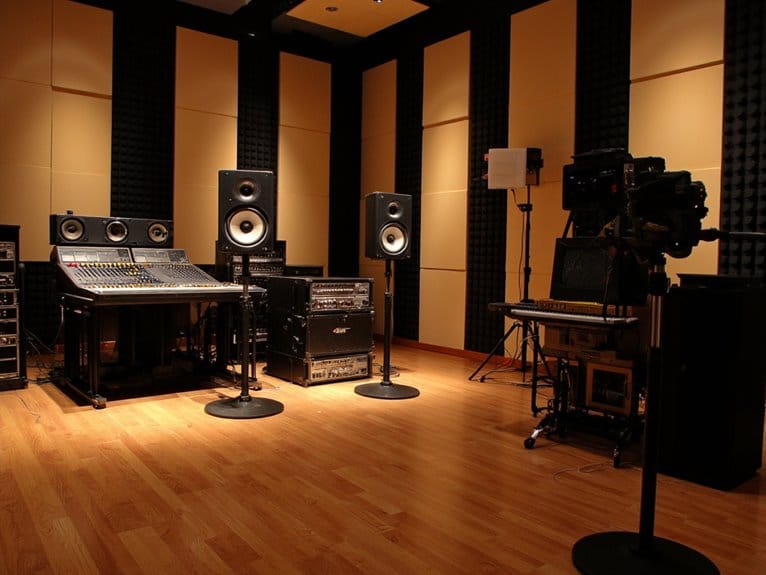
Once you’ve selected the right monitor size for your room, you’ll need to master the geometric principles that guarantee ideal sound reproduction, starting with the fundamental equilateral triangle setup where your listening position and both monitors form three equal points.
This configuration isn’t just acoustic theory—it’s the foundation that determines whether you’ll hear accurate stereo imaging or a lopsided mix that translates poorly to other playback systems.
The specific distances and angles you choose within this triangular framework will make or break your monitoring environment, regardless of how expensive your speakers might be.
Triangle Setup Fundamentals
Three fundamental positioning principles form the backbone of professional studio monitor setup, and I’ve learned through countless hours of tweaking arrangements that getting these basics right makes the difference between muddy, confusing audio and crystal-clear sound reproduction.
The Essential Triangle Setup Elements:
- Equilateral Triangle Formation – Position yourself and your monitors so each side measures exactly the same distance, creating perfect geometric symmetry that guarantees balanced stereo imaging and accurate spatial relationships in your mix.
- Proper Monitor Alignment – Angle your speakers inward approximately 30 degrees toward your listening position, directing tweeters precisely at ear level to maintain ideal frequency response without compromising high-frequency clarity.
- Strategic Sound Reflection Management – Maintain adequate spacing from walls and hard surfaces, using isolation pads to decouple monitors and prevent unwanted bass buildup that can color your sound.
To cross-reference your monitor setup accuracy, use reference tracks that you know well, as this calibration method helps ensure your positioning delivers sound reproduction comparable to commercial releases across different monitoring systems.
Distance and Angle Rules
Getting your triangle right sets the foundation, but precise distance and angle measurements transform that basic setup into a professional monitoring environment that’ll reveal every detail in your mix.
Strategic monitor placement requires maintaining at least one meter from walls to avoid standing wave pressure maxima, while keeping monitors equidistant from side walls promotes symmetrical reflections and balanced imaging.
Turn your monitors inward approximately 30 degrees toward your listening position, creating focused stereo imaging that reduces early reflections and phase issues.
Align tweeters at ear level, roughly 1.2 to 1.4 meters high, then apply gentle downward angle adjustments to minimize floor reflections.
These measurements aren’t suggestions—they’re critical specifications that separate amateur setups from professional monitoring environments where you’ll actually hear what’s happening in your recordings.
Many professional monitors feature acoustic tuning controls that allow you to fine-tune the frequency response based on your specific room characteristics and placement constraints.
Proper acoustic treatment in your monitoring space will further enhance the accuracy of your speaker placement by reducing unwanted reflections that can interfere with precise positioning adjustments.
Acoustic Treatment Requirements by Room Size
When I first started setting up my home studio, I made the classic mistake of assuming that acoustic treatment was a one-size-fits-all solution, only to discover that your room’s dimensions fundamentally dictate which treatment strategies will actually work.
Understanding acoustic treatment essentials becomes essential when matching monitors to your space, because even the best speakers can’t overcome poor room acoustics.
Room-specific treatment approaches:
- Small rooms (under 16 sqm) need aggressive bass trapping in corners, broadband absorbers at first reflection points, and minimal diffusion to prevent over-deadening the already intimate space.
- Medium rooms (16-25 sqm) benefit from balanced absorption and diffusion, with strategic bass traps and rear wall diffusers maintaining stereo imaging while controlling problematic frequencies.
- Large rooms (25-40 sqm) require extensive treatment including ceiling clouds, multiple bass traps, and carefully positioned diffusers to manage longer reverberation times effectively.
Room shape considerations also affect treatment placement strategies considerably.
Listening Distance and SPL Considerations
Once you’ve addressed your room’s acoustic treatment needs, positioning yourself at the proper listening distance becomes the critical bridge between your monitors and accurate sound reproduction, because even perfectly treated rooms can’t compensate for poor listening geometry.
Your ideal listening distance should place you approximately 3 to 5 feet from nearfield monitors, allowing proper driver summation at crossover points while maintaining balanced frequency response. Sitting too close creates driver imbalance, while excessive distance reduces practical SPL measurement levels for critical listening.
I’ve found that larger monitors naturally provide higher maximum SPL capabilities and deeper bass extension, making them suitable for louder monitoring and bass-heavy content, whereas smaller monitors work best in quieter environments with limited SPL requirements and smaller room volumes. When setting up your monitoring chain, consider that budget audio interfaces under $200 can still deliver professional-grade preamps and sound quality comparable to higher-end models, ensuring your monitoring setup captures accurate audio signals from your recording source.
Environmental Factors That Impact Monitor Performance
Environmental factors create the invisible foundation that determines whether your carefully selected studio monitors will deliver their intended performance or become victims of acoustic sabotage in your room.
I’ve witnessed countless mixing sessions derailed by overlooked environmental issues that transform professional monitors into inaccurate playback devices, making proper preparation essential for accurate monitoring.
Your room’s environmental challenges directly impact monitor accuracy through multiple pathways:
- Ambient sound control – Background noise from HVAC systems, traffic, and fluorescent lighting masks critical audio details, requiring noise reduction strategies and proper monitor placement away from contaminating sources.
- Electrical interference management – Unstable power supplies, noisy electrical lines, and electromagnetic interference from nearby equipment degrade monitor performance, necessitating power conditioning and strategic cable routing.
- Strategic vibration isolation – Decoupling pads and proper stands prevent desk resonance while room acoustics treatment controls reflections.
Frequently Asked Questions
Can I Use Studio Monitors for Casual Music Listening and Entertainment?
You can definitely use studio monitors for casual listening and home entertainment. They’ll provide accurate, detailed sound for music and movies, though you might experience listener fatigue during extended sessions compared to consumer speakers.
How Much Should I Budget for Entry-Level Versus Professional Studio Monitors?
You’ll need $100-500 for entry-level features like decent neutrality and clarity, while professional monitors require $800+ budgets. Budget considerations should match your mixing goals – entry-level works for learning, professional delivers superior accuracy.
Do I Need Matched Pairs or Can I Mix Different Monitor Brands?
You need matched pairs for accurate mixing since monitor compatibility guarantees consistent sound quality between left and right channels. Mixing different brands creates tonal imbalances that’ll compromise your stereo imaging and mix decisions.
What Cables and Audio Interfaces Work Best With Studio Monitors?
You’ll want balanced TRS or XLR cable types for best audio quality. Focus on interface compatibility by matching your audio interface’s outputs to your monitor inputs, ensuring clean signal transfer without noise interference.
How Often Should Studio Monitors Be Recalibrated or Professionally Serviced?
You should recalibrate your studio monitors every 6-12 months using proper calibration techniques to maintain accuracy. For monitor longevity, schedule professional servicing every 2-3 years to keep components within specifications.
On a final note
Choosing studio monitors isn’t rocket science, but you’ll want to match your room’s characteristics with appropriate driver sizes, positioning strategies, and acoustic treatments. You’ve got the fundamentals now—consider your space’s volume, listening distance, and environmental factors when making your decision. Don’t overthink it; trust your ears during the audition process. Your room’s unique acoustics will ultimately determine which monitors deliver the most accurate, reliable monitoring experience for your specific situation.

