Guitar Amplifier Positioning and Room Interaction
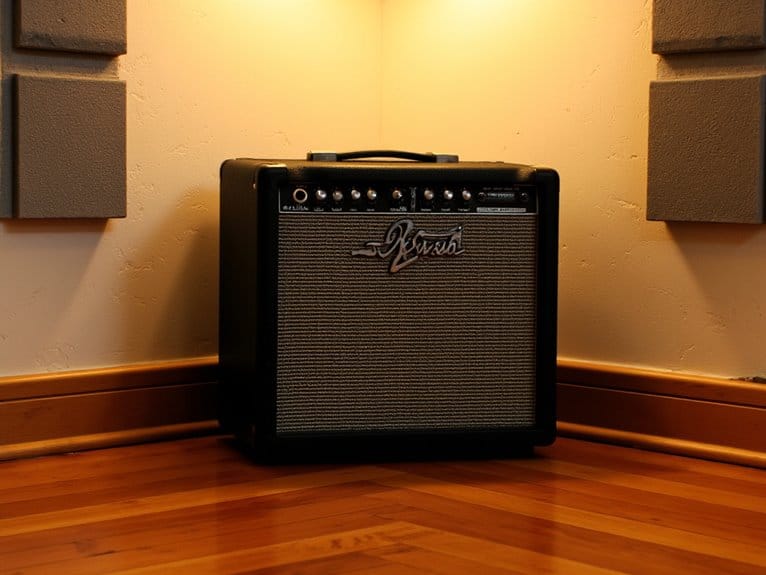
Your amp’s placement fundamentally changes its tone through sound wave reflections and phase cancellations that create muddy bass buildup near walls, while hard surfaces introduce destructive interference. Position your amplifier 2-4 feet from walls, lift it off the floor, and angle it slightly upward to minimize these acoustic issues. Room acoustics act like an invisible equalizer, with bare walls creating harsh early reflections and carpeted areas absorbing vital high frequencies. The techniques below reveal how strategic positioning transforms your sound entirely.
We are supported by our audience. When you purchase through links on our site, we may earn an affiliate commission, at no extra cost for you. Learn more.
Notable Insights
- Lift and tilt amplifiers away from walls to minimize bass buildup and reduce destructive phase cancellations from reflections.
- Position microphones 2-4 inches from the speaker cabinet to capture direct sound while avoiding room bleed and interference.
- Treat rooms strategically by cutting problematic frequencies around 30-50 Hz rather than boosting to prevent muddiness.
- Angle amplifiers upward toward the player to improve monitoring while reducing harsh frequencies that reach the audience.
- Balance direct sound with room acoustics by avoiding hard surfaces that create early reflections and phase issues.
Fundamental Principles of Amp Placement and Sound Reflection
While I’ve spent countless hours chasing the perfect guitar tone through pedals and amp settings, I’ve learned that where you place your amplifier can dramatically alter your sound just as much as any knob adjustment.
When sound waves hit room boundaries, they create sound reflections that bounce back and interfere with your direct sound, causing phase cancellations that produce annoying peaks and dips in your frequency response.
I’ve discovered that positioning your amp too close to walls often creates bass buildup through boundary reinforcement, which muddies your tone considerably. Hard, flat surfaces can introduce destructive interference and phasing that further compromises your sound quality.
Closed cabinets tend to be more directional, so amplifier distance from surfaces becomes critical for maintaining tonal balance while minimizing those problematic reflections that can ruin an otherwise perfect setup. Techniques such as lifting and tilting the amp can minimize phase cancellation and help achieve a cleaner, more defined sound.
Microphone Selection and Positioning Techniques for Guitar Amplifiers
Three distinct microphone types-dynamic, ribbon, and condenser-each capture guitar amplifiers with dramatically different sonic characteristics, and I’ve found that choosing the wrong mic can completely derail an otherwise perfect recording session.
Dynamic mics like the SM57 handle high SPLs while emphasizing midrange punch, making them perfect for aggressive tones. Ribbon mics such as the Sennheiser R-121 smooth harsh frequencies and add warmth, while condensers deliver detailed hi-fi capture with extended frequency response.
Each microphone type brings distinct sonic fingerprints to guitar recording-dynamics punch, ribbons warm, condensers detail.
Your mic distance dramatically affects tone-placing dynamics against the grille near the voice coil edge emphasizes highs, while backing away opens the sound. Maintaining a 2-4 inch distance from your amplifier provides the optimal balance between capturing punch and minimizing unwanted bleed from other sources.
I often combine all three microphone types simultaneously, positioning the dynamic close, ribbon mid-distance, and condenser as a room mic for tonal complexity. Professional microphones with cardioid patterns effectively isolate your amplifier sound while rejecting background noise from nearby instruments or room ambiance.
How Room Acoustics Shape Your Amplifier’s Tone
Even the most perfectly positioned microphone can’t compensate for a room that’s working against your amplifier’s natural tone, and I’ve learned this lesson the hard way after countless sessions where great gear met terrible acoustics.
Your room’s frequency response acts like an invisible equalizer, boosting or cutting specific ranges depending on size, shape, and materials. I’ve noticed how bare walls create early reflections that muddy your sound, while carpeted floors absorb essential high frequencies that give your amp its sparkle.
Smart acoustic treatment involves cutting problematic frequencies rather than boosting, since you don’t want to fight your amplifier’s natural character. Professional audio equipment maintains a frequency response from 20 Hz to 20 kHz to capture the full auditory range, which becomes crucial when your room’s acoustics start coloring your amplifier’s output.
Small rooms require careful consideration of bass buildup around 30-50 Hz, which transforms warmth into unwanted boominess.
When recording your amplifier, choosing an audio interface with zero-latency monitoring ensures you hear your performance in real-time without the delay that can throw off your playing dynamics.
Optimizing Amplifier Orientation for Live Performance Settings
After years of watching guitarists struggle with stage positioning, I’ve discovered that how you orient your amplifier can make the difference between a controlled, professional performance and a chaotic volume war that leaves everyone frustrated.
Amp elevation and angling toward your ears, rather than blasting the audience directly, dramatically improves your monitoring while reducing complaints about excessive volume.
I’ve found that sideways orientation, facing your bandmates instead of the crowd, minimizes that harsh 3500-4000 Hz range that causes listener fatigue.
Tilting your cabinet back or using amp stands prevents the dreaded “tuba effect” from floor reflections, and keeps your high frequencies from hitting audience members’ legs instead of their ears, creating a more balanced sound distribution.
Balancing Player Monitoring With Audience Sound Quality
When I first started paying attention to the delicate balance between player monitoring and audience sound quality, I realized that most guitarists unknowingly create a frustrating tug-of-war between what they need to hear onstage and what sounds good out front.
Most guitarists unknowingly create a frustrating tug-of-war between their onstage monitoring needs and front-of-house sound quality.
The solution involves positioning your amp angled upward toward you, functioning like a floor monitor while directing sound away from the audience.
You’ll want to keep amp gain levels conservative to maintain clarity without excessive stage volume that overwhelms the main PA system. Consider investing in some of the best combo amps for musicians, as they can offer excellent portability and versatile sound options. This way, you can achieve the desired tone without compromising the overall sound balance on stage. Additionally, having a reliable amp can enhance your performance and ensure that your sound cuts through the mix effectively.
Closer positioning enhances your direct monitoring while reducing spillage, and working with sound technicians to establish maximum acceptable stage volume guarantees you’re getting proper monitoring without compromising the audience’s experience or creating feedback issues.
Similar principles apply to acoustic instruments, where sound quality varies significantly based on positioning and room acoustics, just as hand drums demonstrate different tonal characteristics depending on their placement and the materials used in their construction.
Frequently Asked Questions
Can I Use Multiple Amplifiers Simultaneously Without Phase Cancellation Issues?
You can use multiple amplifiers simultaneously by employing A/B/Y boxes with isolation, adjusting physical positioning for proper phase alignment, and utilizing stereo imaging techniques to minimize destructive interference between your amps.
Can Amp Positioning Help Reduce Unwanted Feedback From Other Instruments Onstage?
You’ll achieve better feedback control by positioning your amp behind other instruments, preventing their sound waves from entering your microphone. Amp isolation through physical barriers and strategic placement reduces interference feedback from neighboring stage instruments.
On a final note
You’ve now got the essential knowledge to transform your guitar tone through strategic amplifier positioning, microphone placement, and room acoustic management. Remember, there’s no universal “perfect” setup-your venue, equipment, and musical style will dictate the most effective approach. Start with these fundamentals, trust your ears over theory, and don’t be afraid to experiment. Small adjustments in positioning can yield dramatic improvements in both your monitoring experience and audience perception. Additionally, exploring guitar amplifier upgrade techniques can further enhance your sound. Consider investing in quality cables, effects pedals, and even speaker upgrades to maximize your tonal possibilities. Always stay curious and open to learning from each performance, as every experience can lead to new discoveries in your sound.