Guitar Amplifier Modifications: Safe Upgrades and Customizations
You’ll want to prioritize high voltage safety protocols before attempting any guitar amplifier modifications, since capacitors retain lethal energy even after power disconnection. Start with component upgrades like precision metal film resistors and vintage-grade capacitors, which enhance signal clarity without compromising reliability. Load management through proper impedance matching prevents transformer failures, while strategic circuit modifications involving cathode resistors and coupling capacitors reshape your amp’s sonic personality. Continue exploring these essential techniques for ideal results.
We are supported by our audience. When you purchase through links on our site, we may earn an affiliate commission, at no extra cost for you. Learn more.
Notable Insights
- Master high voltage safety protocols including capacitor discharge procedures and single-hand probing techniques before attempting any amplifier modifications.
- Upgrade to precision metal film resistors and vintage-grade capacitors while ensuring proper polarity and compatibility with existing circuitry.
- Implement proper load matching and use load boxes to prevent transformer damage while achieving desired power tube saturation.
- Modify coupling capacitors and cathode resistors strategically to reshape the amplifier’s sonic personality and frequency response characteristics.
- Install star grounding layouts and enhance natural convection cooling to improve signal integrity and prevent component degradation from heat.
Essential Safety Precautions Before Starting Any Modification
Before you even think about cracking open that amplifier chassis, I can’t stress enough how critical it’s to understand that guitar amps, especially tube models, contain voltages that can literally kill you on the spot.
High voltage capacitors store dangerous energy for days after you’ve switched off the power, which means unplugging the amp isn’t enough protection. You’ll need proper safety gear including a multimeter, dedicated capacitor discharge tool, and non-conductive probes for moving wires safely.
Workspace organization matters too – keep your area clean, free from conductive debris, and guarantee you’re wearing appropriate clothing that won’t expose skin to potential solder splatter or accidental contact with energized components. Remove all metal jewelry before beginning any work, as these items can create dangerous electrical contact points with live components. When probing live circuits for voltage readings, always keep one hand in your pocket to minimize the risk of current flowing across your heart.
Protecting Your Amplifier With Proper Load Management
Once you’ve got your safety protocols down pat, the next critical aspect that’ll save you from expensive repair bills is understanding how your amplifier’s output stage interacts with whatever load you’re connecting to it.
Proper load matching between your amp’s output impedance and speaker impedance prevents excessive current flow that can lead to catastrophic amplifier damage, particularly transformer failure in tube amps.
Mismatched impedance creates dangerous current spikes that destroy expensive output transformers – proper load matching is essential protection.
I’ve seen too many blown transformers from mismatched loads, and trust me, those repairs aren’t cheap.
Load boxes offer excellent safe operation solutions, allowing you to achieve power tube saturation at manageable volumes while maintaining tone preservation.
These devices provide proper setup for home practice, studio work, and volume control without compromising your amp’s natural characteristics or risking component damage.
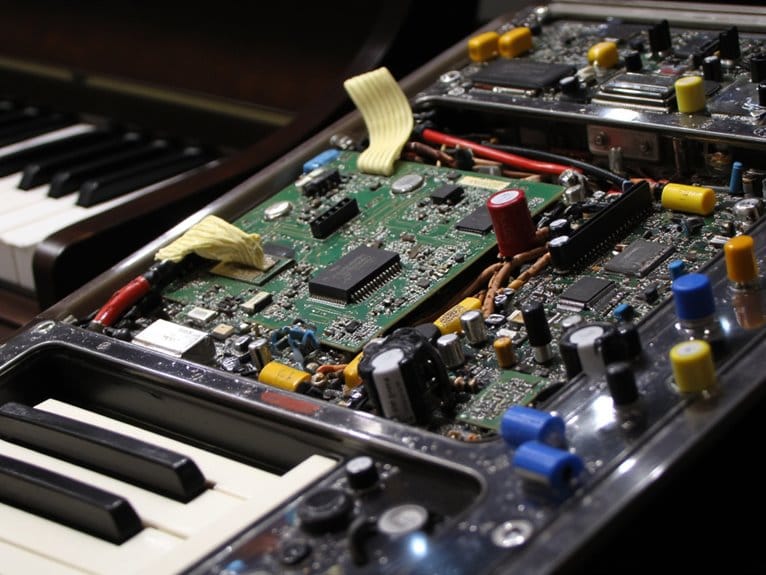
Upgrading Components for Better Performance and Reliability
The heart of any meaningful amplifier modification lies in upgrading individual components, which transforms your amp’s performance characteristics while building a foundation for long-term reliability that’ll keep you playing instead of constantly visiting repair shops.
When you’re tackling component sourcing, focus on precision metal film resistors and vintage-grade capacitors like Mullard mustard caps, though they’ll cost more than standard replacements.
Upgrade compatibility becomes essential when swapping preamp tubes, power tubes, and coupling capacitors, since mismatched impedances or values can damage your amp’s transformers.
I’ve learned that replacing electrolytic capacitors requires careful attention to polarity, while high-quality solder joints eliminate those annoying crackling noises that plague older amps during performance.
Modern solid-state amps often incorporate sophisticated tone-shaping capabilities beyond basic volume controls, making component upgrades particularly effective for enhancing EQ responsiveness and overall signal clarity. These advanced features enable musicians to tailor their sound precisely to their preferences, allowing for a more personalized audio experience. Additionally, many players seek out amps with clean sound, as this quality is essential for accurately reproducing the nuances of their performance. As a result, upgrading key components in solid-state amplifiers can lead to significant improvements in both versatility and tonal fidelity. For those seeking a compact, all-in-one solution, a combo guitar amp can provide not only portability but also a rich feature set tailored for diverse playing styles. These amps are designed to bring out the best in both cleans and overdriven tones, making them popular choices for gigging musicians. By incorporating high-quality components and innovative technology, combo guitar amps can further enhance the playing experience, delivering impressive sound without compromising on performance.
Similar to drum trigger installations where mounting solutions can make or break your setup’s effectiveness, proper component mounting and grounding in amplifier modifications determines whether your upgrades enhance performance or introduce unwanted noise and reliability issues.
Enhancing Tone and Sound Character Through Circuit Modifications
Beyond simply replacing worn-out parts with higher-quality alternatives, you’ll discover that strategic circuit modifications can dramatically reshape your amplifier’s sonic personality, transforming a bright, sterile-sounding amp into a warm, musical instrument that responds to your playing dynamics.
Strategic circuit modifications can transform your amplifier’s sonic personality from bright and sterile into a warm, responsive musical instrument.
Cathode resistor modifications provide the most accessible entry point, where increasing resistance values expands headroom while decreasing them promotes earlier saturation.
I’ve found that coupling capacitor swaps offer remarkable tone shaping capabilities, with vintage-style film caps delivering warmer midrange and clearer highs.
For precise frequency modulation, adjusting coupling cap values brightens or warms your sound—smaller values increase treble response, larger ones boost bass frequencies.
Plate load resistor adjustments and grid leak modifications further refine gain structure and reduce noise, creating personalized sonic signatures.
When modifying tube amplifiers for apartment living, consider that low-wattage amps around 5-10 watts provide the perfect balance between tone and neighbor-friendly volume levels.
Similar to how pickup configuration modifications in guitars affect tonal characteristics, amplifier circuit changes must be carefully considered to match your personal playing style and desired sound output. Exploring different amplifier circuit modifications can open up new sonic possibilities, allowing guitarists to tailor their tone to suit specific genres or performance settings. For example, integrating a multichannel amplifier tonal versatility can enable musicians to seamlessly switch between clean and distorted sounds, enhancing their overall dynamic range. Ultimately, both guitar and amplifier adjustments play a critical role in crafting a unique sonic identity that reflects individual artistry.
Mechanical and Structural Improvements for Longevity
While tone modifications grab most of the attention, I’ve learned that securing your components properly, upgrading cooling systems, and improving chassis grounding can extend your amp’s life by decades.
You’ll find that loose transformers create microphonic feedback and eventual mounting failures, while inadequate ventilation causes capacitor drift and tube degradation that’ll cost you more in repairs than prevention.
These structural improvements aren’t glamorous, but they’re the foundation that keeps your tone modifications working reliably for years to come.
Secure Component Mounting
Longevity in guitar amplifier modifications hinges on meticulous attention to component mounting practices, where I’ve learned that even the smallest oversight can lead to catastrophic failures months down the road. This precision is essential not only for the amplifier’s performance but also for preserving the vintage guitar amplifier characteristics that many musicians cherish. The right modifications can enhance tone and reliability, but when executed incorrectly, they can undermine the very essence of what makes these amplifiers special. Ultimately, a thorough understanding of both technical and aesthetic aspects is vital for ensuring their sound quality and longevity.
You’ll want to focus on proper component leg bending techniques that guarantee stable fits within board eyelets, while maintaining strict schematic accuracy throughout your assembly process.
Here’s my proven approach for secure mounting:
- Straighten all leads before insertion to reduce mechanical stress and facilitate proper seating
- Bend component legs on the underside after insertion to physically lock parts in place
- Install polarized components according to markings to prevent damage and maintain peak performance
I’ve found that following these practices, combined with quality solder connections and organized workflow preparation, dramatically improves long-term reliability in modified amplifiers.
Enhanced Cooling Systems
Heat buildup can absolutely destroy even the most carefully executed amplifier modifications, which is why I’ve made enhanced cooling systems a cornerstone of every project I tackle.
You’ll want to install 120mm DC fans positioned to pull hot air outward, leveraging natural convection currents for maximum effectiveness. Proper airflow direction matters more than you’d think—blowing air out beats forcing it in every single time.
Temperature-controlled activation keeps fan noise minimal during quieter playing sessions, while speed controllers let you balance cooling performance against acoustic interference. Metal chassis construction provides superior noise interference reduction compared to plastic alternatives when implementing these cooling modifications.
I always add chassis vent holes near heatsinks, raise units with nylon spacers for better circulation, and use thermal sensors on transformers for accurate monitoring.
These mechanical improvements protect your investment while preserving that vital tube tone. Consider routing your audio interfaces through proper cable management to prevent heat-sensitive components from being affected by poor airflow around external recording equipment.
Chassis Grounding Upgrades
Because proper grounding determines whether your amplifier modifications will deliver pristine tone or endless frustration, I’ve learned that upgrading the chassis grounding system isn’t just about reducing noise—it’s about creating a rock-solid foundation that’ll outlast decades of heavy use.
Vintage Fender’s brass grounding approach offers three key mechanical improvements I consistently recommend:
- Brass plate ground systems provide easier soldering compared to modern chassis metals, creating reliable, long-lasting connections.
- Integrated chassis-to-earth bonding guarantees mandatory safety compliance while maximizing EMI shielding effectiveness through proper Faraday cage implementation.
- Star grounding layouts eliminate problematic return currents flowing through chassis metal near sensitive preamp circuits.
These upgrades transform problematic hum issues into cost-effective solutions, especially when you’re dealing with vintage chassis that were originally plated for superior ground bonding compared to today’s poor-quality alternatives. Modern amplifiers like Blackstar’s Debut series utilize all-analog circuitry that maintains natural clarity across frequencies, making proper grounding even more critical for preserving signal integrity. Just as bass cabinets benefit from birch plywood construction for enhanced durability during gigging, amplifier chassis require equally robust grounding systems to withstand the rigors of live performance environments.
High Voltage Safety Guidelines for Tube Amplifier Work
Before you touch anything inside that tube amp chassis, you’ll need to master three critical safety protocols that separate experienced techs from those who’ve learned painful lessons the hard way.
Proper capacitor discharge procedures, using the single-hand technique while probing circuits, and having emergency response plans ready aren’t just suggestions—they’re the difference between a successful mod and a trip to the emergency room.
I’ve seen too many otherwise careful builders get complacent with high voltage safety, and trust me, those 400+ volt filter caps don’t care how experienced you think you are.
Capacitor Discharge Procedures
Why do so many guitar techs, myself included, develop a healthy respect for capacitors after working on tube amps for a while? Because those filter caps can hold lethal voltage long after you’ve unplugged the amp, and I’ve learned this lesson through some genuinely heart-stopping moments.
Here’s my proven discharge procedure:
- Turn off and unplug the amplifier completely before starting any work.
- Use proper discharge tools like a 470-ohm resistor with insulated wire, never bare metal.
- Test voltage levels with a multimeter after discharge to confirm safety.
Different capacitor types require varying discharge times, sometimes several minutes depending on their capacitance values.
Always verify complete discharge at multiple points throughout the power supply section, because residual charges can rebuild unexpectedly from transformer inductance.
Single Hand Technique
When working inside energized tube amplifiers, I’ve learned that the single-hand technique isn’t just a suggestion—it’s the difference between a successful repair and a trip to the emergency room. This shock prevention method keeps current from traveling through your chest cavity, which I can tell you from experience is something you absolutely want to avoid.
| Do This | Never Do This |
|---|---|
| Use only one hand for probing | Touch chassis with both hands |
| Keep free hand away from ground | Rest hand on chassis edge |
| Use insulated tools with firm grip | Contact two points simultaneously |
| Position body clear of voltage paths | Bridge contact points with body |
| Hold tools in single hand only | Use both hands near energized circuits |
The technique requires discipline, but mastering this fundamental approach transforms dangerous voltage into manageable risk.
Emergency Response Preparation
Here’s what I’ve learned about preparing for the worst-case scenario:
- Learn CPR and basic first aid – Keep certification current and accessible reference materials nearby.
- Never work alone – Having a partner increases survival chances dramatically during electrical emergencies.
- Establish emergency contacts – Post local emergency numbers and inform someone of your work schedule.
Keep a well-stocked first aid kit within arm’s reach, because burns and cuts happen even to experienced technicians.
Frequently Asked Questions
Will Modifying My Amplifier Void the Manufacturer’s Warranty?
Yes, you’ll likely void your manufacturer’s warranty by modifying your amplifier. Most manufacturers exclude any modifications from coverage. Before proceeding, conduct thorough amplifier research and carefully review warranty implications in your manual.
How Much Should I Budget for a Complete Amplifier Modification Project?
You’ll need budget considerations ranging from $200-$800+ depending on modification types you’re pursuing. Basic upgrades cost $50-$300, while extensive transformer or rewiring projects can exceed $500, plus $100/hour labor charges.
Can I Perform Modifications on Vintage Amplifiers Without Affecting Their Value?
You can’t perform vintage restoration modifications without affecting value – even minor tonal improvements typically reduce collectibility. Only reversible, documented changes might minimize impact, but original condition remains most valuable to collectors.
What Tools and Equipment Do I Need to Start Modifying Amplifiers?
You’ll need essential tools including a temperature-controlled soldering iron, digital multimeter, wire strippers, and screwdrivers. Master proper soldering techniques first, then invest in safety equipment like isolation transformers and ESD protection for reliable work.
How Do I Find Qualified Technicians for Complex Modifications I Can’t Handle?
You’ll find qualified techs by checking guitar technician certifications from major manufacturers like Fender or Marshall. Research amplifier repair reviews on musician forums and local music communities for recommendations on complex modification specialists.
On a final note
You’ve now got the essential knowledge to safely modify your amplifier, from basic component upgrades to complex circuit alterations. Remember, you can’t rush high-voltage work—your safety depends on proper procedures and patience. Start with simple modifications like speaker swaps or tube rolling before tackling circuit changes. Whether you’re chasing vintage warmth or modern clarity, these techniques will help you achieve your sonic goals while protecting both yourself and your investment.