DIY Drum Room Acoustic Treatment
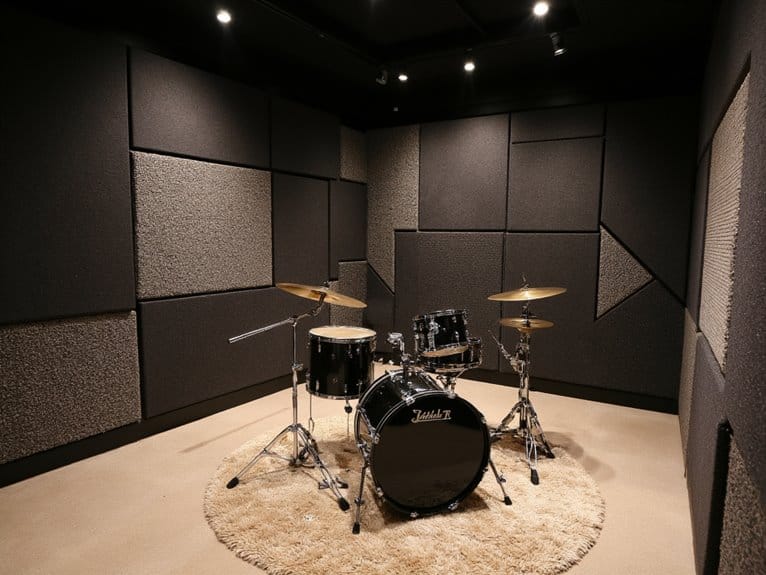
You’ll transform your drum room’s acoustics by strategically placing DIY acoustic panels made from mineral wool or fiberglass in wooden frames at first reflection points, while installing bass traps in corners to control low-frequency buildup that muddies your sound. Mount acoustic foam using 3M Command Strips for rental-friendly solutions, or construction adhesive for permanent installations, targeting mid-to-high frequency absorption where hard surfaces create unwanted reflections. The complete treatment strategy involves ceiling baffles, diffusion elements, and precise measurement techniques that’ll optimize your room’s sonic character.
We are supported by our audience. When you purchase through links on our site, we may earn an affiliate commission, at no extra cost for you. Learn more.
Notable Insights
- Use acoustic foam panels for mid-to-high frequencies and mineral wool or fiberglass for broader frequency absorption with high NRC ratings.
- Build sturdy frames from MDF or plywood to house insulation materials, using wood glue and brad nails for assembly.
- Mount foam using 3M Command Strips for renters or spray adhesives for permanent installation on smooth surfaces.
- Place bass traps in corners and absorption panels at first reflection points to control frequency build-up and early reflections.
- Test acoustics using Room EQ Wizard, aiming for 0.3-0.6 seconds RT60 decay time and ±3dB frequency response variation.
Understanding Sound Behavior in Drum Rooms
Why does your perfectly tuned drum kit sound muddy and unclear the moment you start playing in your basement or garage?
The answer lies in room acoustics, where sound reflections create a chaotic mess that masks your drum’s natural tone. When you strike a drum, sound waves bounce off walls, causing bass build up in corners and creating standing waves that vary dramatically depending on your listening position.
Sound waves bouncing off walls create acoustic chaos that transforms your crisp drum tones into muddy, unclear noise.
These reflections interfere with transient clarity, making fast passages sound blurred and indistinct. Your room’s frequency response becomes uneven as certain frequencies amplify while others cancel out completely. The room’s acoustic properties can also affect how overtones decay, potentially masking the fundamental tones that give each drum its characteristic pitch and timbre.
Hard surfaces in your room significantly impact sound clarity, often contributing to muddiness by creating excessive reflections that blur the natural drum transients. Effective echo reduction and modal control aren’t just studio luxuries—they’re essential for hearing what your drums actually sound like, rather than fighting against your room’s acoustic fingerprint. When recording your drums, achieving proper acoustic treatment becomes even more critical to capture zero-latency monitoring and maintain the natural dynamics of your performance.
Essential Materials for Acoustic Treatment
The foundation of effective drum room treatment starts with understanding your material options, because choosing the wrong acoustic products will leave you frustrated and your drums sounding worse than before.
Material selection directly impacts acoustic performance, with each type serving specific frequency ranges and installation requirements. Acoustic foam panels excel at mid-to-high frequency absorption, while mineral wool and fiberglass offer superior treatment effectiveness across broader ranges with NRC values reaching 1.0.
Bass traps become essential for corner placement, controlling low-end buildup that muddles your kit’s clarity. Understanding the absorption coefficient helps you evaluate how effectively each material converts sound energy rather than reflecting it back into your room.
Similar to how bass amplifiers benefit from balanced frequency response for optimal sound clarity, your acoustic treatment materials must work together to address the full spectrum of drum frequencies.
- Acoustic foam panels provide cost efficiency and flexibility options with various surface patterns and thickness choices
- Mineral wool insulation delivers exceptional acoustic performance when combined with fabric covers for aesthetic integration
- Bass traps offer targeted low-frequency control using installation techniques that maximize corner effectiveness
Building Your Own Acoustic Panels
Building effective acoustic panels for your drum room requires mastering three vital components that’ll transform your space from a chaotic echo chamber into a controlled recording environment.
You’ll need to construct sturdy frames using MDF or plywood strips, typically 3.5″ to 6″ wide, while considering whether to mount acoustic foam directly to walls or build proper mineral wool panels with fabric wrapping for superior absorption.
The placement strategy becomes essential since randomly scattered panels won’t deliver the acoustic control you’re after, but strategically positioned treatments at first reflection points, behind your kit, and on parallel walls will dramatically improve your room’s sound quality. Professional acoustic treatment should work alongside quality recording equipment that captures audio at 24-bit/192kHz resolution to preserve the full detail of your improved drum sound.
Once your acoustic treatment is complete, you’ll want to capture your improved drum sound with a quality recording setup that includes an audio interface to ensure your investment in room acoustics translates into professional recordings.
Frame Construction Methods
Four essential components form the backbone of any DIY acoustic panel: the frame material, construction technique, dimensional planning, and assembly method, each demanding careful consideration to guarantee your panels perform effectively while staying within budget.
I’ve found that selecting proper frame materials like pine or poplar lumber creates the foundation for durable panels, while frame dimensions should accommodate insulation plus a quarter-inch gap to prevent fabric distortion.
Your assembly techniques will determine longevity—wood glue combined with brad nails produces corner joints that’ll withstand years of use.
Consider these critical frame construction elements:
- Install rigid supports using corner braces to maintain structural integrity and create ideal air gaps
- Plan insulation gaps carefully to prevent visible imperfections while maximizing acoustic performance
- Choose backing options that complement your panel aesthetics and mounting requirements
Foam Mounting Techniques
Five mounting approaches can secure your acoustic foam panels effectively, though I’ve learned through trial and error that choosing the wrong method often leads to damaged walls, fallen panels, or foam that tears when you’re trying to reposition it.
For renters, 3M Command Strips offer damage-free removal, though their weight capacity varies with different foam types.
Spray adhesives like 3M general purpose 45 create permanent bonds on smooth surfaces, while construction adhesives handle textured walls better.
Push pins work as adhesive alternatives, leaving only tiny holes but requiring careful placement to prevent tearing.
I recommend mounting foam onto lightweight backing boards first, which protects your walls and lets you reposition panels easily when tweaking your room’s acoustics.
Panel Placement Strategy
Once you’ve secured your foam panels properly, where you place them matters far more than how many you install. I’ve watched countless drummers cover entire walls with thin foam only to wonder why their room sounds worse than before.
Strategic panel positioning starts with identifying primary reflection points on side walls near your kit and listening position, where sound waves first bounce and create clarity issues. Effective reflection control requires targeting these specific areas rather than randomly dispersing panels across surfaces.
- Focus on corners first with thick bass traps (4-12 inches) to control low-frequency buildup before addressing mid and high frequencies.
- Place panels at ear height to intercept direct reflections, with ceiling treatment above your drum kit for upward-traveling sound waves.
- Combine absorption with diffusion elements, spacing panels evenly to maintain natural room ambiance while reducing problematic echoes.
Strategic Placement of Treatment Elements
The acoustic fingerprint of your drum room depends entirely on where you place each treatment element, much like how a chess master positions pieces to control the board. Your reflection points need immediate attention, starting with side walls closest to your kit where sound bounces create the most interference. Bass traps go in corners where low frequencies accumulate, while panel patterns should follow a checkerboard arrangement on opposing walls to break up standing waves.
| Treatment Type | Optimal Placement | Primary Function |
|---|---|---|
| Absorption Panels | First reflection points | Reduce early reflections |
| Bass Traps | Room corners | Control low-frequency buildup |
| Diffusion Elements | Rear walls | Scatter sound waves |
Sound diffusion and vibration damping work together to achieve treatment balance, ensuring your room acoustics support clear, punchy drum recordings without sacrificing natural ambience.
Soundproofing Vs Sound Treatment Techniques
While strategic placement sets the foundation for your drum room’s acoustic character, understanding whether you need soundproofing, sound treatment, or both will determine your project’s direction and budget.
I’ve learned that soundproofing basics involve blocking sound transmission using dense materials like mass loaded vinyl and acoustic seals, while sound treatment improves internal acoustics through absorption panels and bass traps. These acoustic challenges require different approaches and budgets.
- Soundproofing prevents sound from escaping your room but doesn’t improve internal sound quality.
- Sound treatment controls reflections and reverberation inside the room without blocking external transmission.
- Combined approach offers ideal results but requires careful planning of both isolation materials and absorptive elements.
Most drummers benefit from prioritizing treatment first, then adding soundproofing elements as needed.
Ceiling and Overhead Treatment Solutions
When you look up at your drum room’s ceiling, you’re staring at one of the most critical acoustic surfaces that can either enhance or destroy your sound quality through reflections, echoes, and standing wave formations.
I’ve learned through countless installations that proper ceiling treatment requires a strategic combination of hanging baffles for upward sound control, mounted panels for direct reflection management, and targeted placement to eliminate those harsh overhead echoes that muddy your drum mix.
You’ll need to take into account three essential approaches: installing suspended acoustic baffles that intercept sound traveling upward, mounting absorption panels directly to ceiling surfaces with proper air gaps, and implementing overhead echo control systems that address the specific reflection patterns created by your drum kit’s vertical sound projection.
Hanging Baffle Installation
Since most drum rooms suffer from excessive ceiling reflections that muddy your recordings, hanging baffles offer one of the most effective overhead treatment solutions you can install yourself.
These fabric-wrapped panels suspend from light-duty chains or cables, allowing precise hanging baffle adjustment for ideal sound control in your specific space.
I’ve found that proper acoustic panel design using dense fiberglass or cotton materials achieves NRC ratings above 0.85, dramatically reducing those annoying flutter echoes that plague tall-ceiling rooms.
The installation process involves securing mounting hardware to ceiling joists, then positioning panels with small gaps above for airflow.
- Attach chains or cables to sound-absorbing panels using included suspension kits
- Mount fixing brackets into ceiling joists or beams for secure weight support
- Adjust hanging height based on room dimensions and drum kit placement
Ceiling Panel Mounting
Three primary mounting approaches can transform your drum room’s ceiling into an effective acoustic control surface, each offering distinct advantages depending on your room’s construction, panel weight, and long-term flexibility needs.
Direct screw mounting with toggle bolts handles heavy rock wool panel types securely, though you’ll need to locate ceiling joists for maximum support.
Adhesive mounting methods work well for lighter panels, avoiding structural damage while sacrificing some long-term stability—I’ve seen panels gradually sag over time in humid conditions.
Suspended track systems offer the most flexibility, allowing you to reposition panels as your acoustic needs evolve, though they require more initial investment and installation complexity than basic mounting methods.
Overhead Echo Control
Although proper ceiling mounting creates the foundation for acoustic treatment, controlling overhead echo requires strategic placement and material selection that addresses the specific reflection patterns bouncing off surfaces above your drum kit.
I’ve found that positioning high-density fiberglass panels directly above where early reflections occur provides the most effective echo reduction, particularly when you maintain at least six inches between panels and ceiling for maximum absorption.
The key lies in targeting those problematic acoustic reflection zones without completely deadening your room’s natural character.
- Use a simple clap test to identify specific echo points, then position panels accordingly
- Aim for RT60 decay times under 0.5 seconds in the critical 500Hz-4kHz frequency range
- Combine overhead treatment with directional microphones to minimize unwanted ceiling reflections
This targeted approach greatly improves recording clarity while preserving essential room ambience.
Frequently Asked Questions
How Much Does a Complete DIY Drum Room Acoustic Treatment Typically Cost?
You’ll spend $2,000-$4,000 for mid-range treatment, though materials cost can reach $7,000-$8,000 for high-end setups. Installation labor isn’t included but could double your budget if you hire professionals.
Can I Treat My Drum Room Without Permanently Altering the Existing Structure?
You can definitely treat your drum room without permanent alterations using removable panels, portable bass traps, and heavy curtains. These portable solutions offer effective acoustic control while preserving your space’s original structure completely.
What Tools Do I Need to Install Acoustic Panels and Bass Traps?
You’ll need basic power tools like drills and screwdrivers, measuring equipment including tape measures and levels, plus safety gear. Follow manufacturer’s installation guides for specific mounting hardware and adhesive requirements.
On a final note
You’ve now got the foundation to transform your drum room from an acoustic nightmare into a controlled, professional environment. Start with bass traps in corners, add absorption panels at reflection points, and don’t forget overhead treatment. Remember, you’re not chasing perfection—you’re pursuing improvement. Test frequently, adjust gradually, and trust your ears. Your neighbors will thank you, and your recordings will reflect the effort you’ve invested.