Building a Silent Platform for Electronic Drums
To build a silent electronic drum platform, you’ll need 23mm phenolic plywood layered with Sylomer isolation pads and high-density Regufoam 150, creating a decoupled foundation that reduces vibration transfer by up to 75%. Space tennis ball halves or elastomeric isolators between rigid MDF layers, add Green Glue for dampening, and make sure your platform measures approximately 170×130 cm for maximum stability. This multi-layer approach prevents mechanical vibrations from traveling through hardware into floors, while strategic pad placement under heavier components like bass drums minimizes low-frequency transmission that typically causes the most neighbor complaints, and there’s much more to take into account for complete acoustic isolation.
We are supported by our audience. When you purchase through links on our site, we may earn an affiliate commission, at no extra cost for you. Learn more.
Notable Insights
- Use 23mm phenolic plywood with Sylomer isolation pads offering up to 99% impact sound insulation at 50Hz frequencies.
- Create multi-layer platform with MDF, vibration-absorbing foam, and Green Glue between tennis ball halves or elastomeric isolators.
- Build modular design approximately 170×130 cm avoiding direct wall contact for optimal stability and noise reduction performance.
- Place high-density Regufoam 150 pads strategically under heavier drum components to ensure even weight distribution.
- Test noise levels with calibrated SPL meter before and after construction to measure platform effectiveness objectively.
Understanding Vibration Transfer and Impact Noise
When you strike a drum pad during practice, you’re not just creating the sound you hear through your headphones—you’re also generating mechanical vibrations that travel through every connected piece of hardware, down through your drum rack, and directly into the floor beneath your kit.
Understanding vibration dynamics becomes essential when you realize these impacts create a complex web of energy transfer, moving through cymbal boom arms, pedal mechanisms, and interconnected mounting systems that amplify the original strike force. Acoustic drums converted to hybrid setups with dual-zone triggering can experience different vibration patterns depending on whether the head or rim is struck.
The impact acoustics differ considerably between mesh heads and solid pads, with solid surfaces transmitting stronger vibrations that propagate more efficiently through your building’s structure, creating those telltale thumps and clicks that travel through floor joists to disturb neighbors below. Bass drum vibrations can prove especially problematic due to their low-frequency energy and powerful impact force. Effective vibration control requires proper energy dissipation, as simply storing vibrational energy without converting it to heat will not eliminate the transmission of sound through your building’s structure.
Essential Materials for Effective Drum Isolation
Now that you understand how vibrations travel through your drum kit and into your building’s structure, selecting the right materials becomes the foundation of your isolation strategy.
Specialized Sylomer-based noise isolating pads, measuring 13x13x2.5 cm and supporting approximately 19kg each, represent the gold standard for pad materials in electronic drum isolation. When you stack two pads, you’ll achieve up to 99% impact sound insulation at 50 Hz frequencies.
For platform construction, I recommend phenolic plywood at 23mm thickness or greater, though MDF offers excellent vibration absorption with superior aesthetics. The multilayer wood plate construction provides optimal performance for decoupling sound from electronic drums and reducing low-frequency noise transmission through building structures.
High-density Regufoam 150 provides exceptional load-bearing properties while maintaining acoustic performance. Proper load distribution requires strategic pad placement, with increased density under heavier zones like your drummer’s seat, ensuring even weight distribution across your entire platform system. Mesh heads offer significant noise reduction benefits for apartment practice, making them an ideal complement to your isolation platform setup.
Essential construction tools include a drill, hammer, wrench, staple gun, and carpet knife for proper assembly and installation.
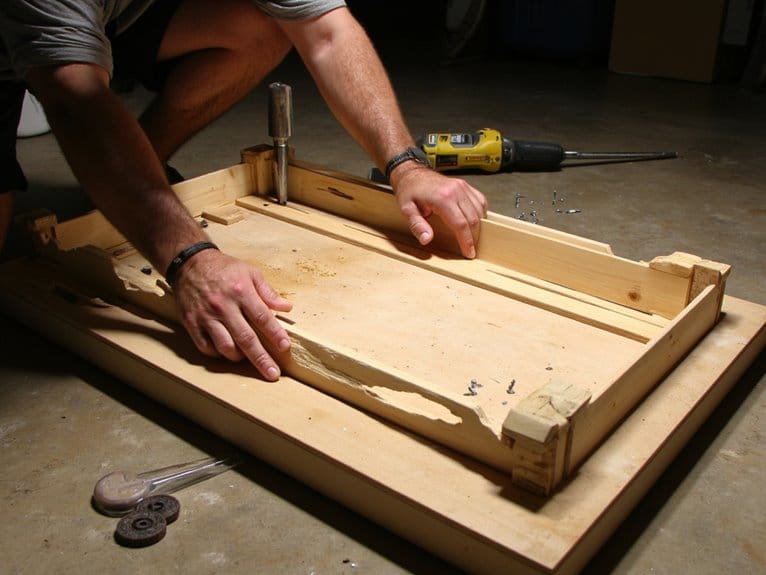
DIY Platform Construction Techniques
With your materials selected and ready, I’ll guide you through constructing a multi-layered isolation platform that transforms your electronic drums from a neighbor-annoying nightmare into a whisper-quiet practice setup. Your platform design should incorporate multiple isolation layers, starting with a base MDF board, followed by vibration-absorbing foam like Sylomer, then another MDF layer with Green Glue sandwiched between. Assembly techniques require precise spacing of tennis ball halves or elastomeric isolators between rigid layers, secured with cable ties for durability. Consider using Eva foam pads as an effective substitute for expensive commercial options, which can significantly reduce your construction costs.
| Construction Layer | Primary Function |
|---|---|
| Top MDF + Carpet | Surface stability, aesthetics |
| Middle Foam/Tennis Balls | Vibration isolation, shock absorption |
| Bottom MDF Base | Structural foundation, weight distribution |
Build modular sections for easier transport, ensuring no direct wall contact to prevent vibration transmission throughout your room’s structure. The ideal platform dimensions should target 170×130 cm to provide adequate stability for your complete electronic drum setup while maintaining structural integrity across all components.
Commercial Solutions Vs Custom Builds
Having explored the hands-on approach to building your own silent platform, you’re probably wondering whether it’s worth the effort when manufacturers like Roland offer complete silent drum solutions right out of the box.
Commercial kits deliver engineered quietness through VQD technology, reducing noise by 75% with mesh heads, rubber grids, and integrated shock absorption, though they’ll cost several thousand dollars for this convenience. These premium models incorporate advanced technology that successfully replicates the authentic feel and sound response that drummers expect from acoustic kits. The most sophisticated units feature XLR stereo output for seamless integration with professional sound systems during live performances.
Custom platforms, while noticeably cheaper using basic materials like plywood and isolation pads, require trial-and-error optimization and can’t match the extensive noise reduction of purpose-built hardware.
The reality is that commercial solutions provide superior sound libraries, advanced modules, and guaranteed performance, while DIY builds offer budget-friendly isolation that depends entirely on your construction skills and material choices.
Testing and Optimizing Your Silent Setup
Most drummers who’ve assembled their silent setup discover that the real work begins once everything’s in place, because what looks quiet on paper doesn’t always translate to whisper-soft performance in practice.
The gap between theoretical silence and actual practice performance often surprises even experienced drummers with their supposedly quiet setups.
You’ll need a calibrated SPL meter to measure your baseline noise levels before implementing effective soundproofing techniques, ensuring consistent microphone placement for repeatable acoustic performance measurement.
I’ve found that testing incremental changes—swapping mesh heads, adjusting trigger sensitivity, or adding isolation layers—reveals which modifications actually reduce decibels versus those that merely feel different. Remember that high-frequency sounds tend to feel louder to our ears even when SPL readings show similar decibel levels across different frequency ranges.
Some drummers face police encounters due to volume complaints, making proper noise measurement and control essential for avoiding conflicts with neighbors and authorities.
Document each adjustment carefully, because what seems quieter during your late-night practice session might still wake the neighbors when you’re really getting into that double-bass groove.
On a final note
You’ve now got the knowledge to tackle your drum isolation project, whether you’re building from scratch with tennis balls and plywood or investing in commercial solutions. I’ve found that most setups achieve 70-80% noise reduction when properly executed, though your results will vary based on floor type and construction quality. Remember, you don’t need perfection—even modest improvements will keep your neighbors happy and your practice sessions uninterrupted.