Adding Triggers to Acoustic Drums: Hybrid Setup Guide
You’ll create a powerful hybrid drum setup by mounting dual-zone triggers like Roland’s RT-30 series onto your acoustic drums, positioning them with 2-3mm clearance from drumheads to avoid damping. Connect triggers using TRS cables to your module, then configure threshold and sensitivity settings to prevent false triggering while maintaining dynamic response. This approach lets you blend natural acoustic tones with electronic samples, expanding your sonic palette across genres. The complete process involves several essential calibration steps that secure peak performance.
We are supported by our audience. When you purchase through links on our site, we may earn an affiliate commission, at no extra cost for you. Learn more.
Notable Insights
- Choose dual-zone triggers like Roland RT-30HR or Yamaha DT-50S for head and rim detection capabilities.
- Position triggers lightly against drumheads with 2-3mm clearance to prevent damping and false triggering.
- Use TRS cables for dual-zone signals and route through vent holes to protect against movement.
- Adjust threshold, sensitivity, and mask time settings to optimize dynamic range and eliminate crosstalk issues.
- Layer acoustic tones with electronic samples through trigger modules for diverse hybrid soundscapes.
Understanding Trigger Types and Optimal Placement
Breaking down the world of drum triggers, I’ve found that understanding the fundamental differences between trigger types makes all the difference in creating a hybrid setup that actually works for your playing style.
Single-zone triggers handle basic triggering from the drumhead only, while dual-zone models like Yamaha’s DT-50S distinguish between head and rim hits, expanding your sound palette considerably.
When it comes to placement techniques, you’ll want to position sensors lightly against the drumhead without applying pressure that dampens resonance.
Rim-mount triggers offer reliability through tension rod attachment, though clip-on models provide easier repositioning for irregular shells. These triggers work by converting vibrations from the drum surface into electronic pulses that get sent to your module for sound assignment.
I recommend avoiding direct striking zones to prevent hot spots that create unwanted triggering artifacts. Head contact triggers represent the most common and affordable option, though they tend to be more fragile than their rim-mount counterparts.
Cable Connections and Wiring Setup
Once you’ve positioned your triggers correctly, you’ll need to tackle the wiring setup, which honestly can make or break your entire hybrid drum system’s performance.
TRS cables become your best friend here, especially for dual-zone triggers, since they carry both head and rim signals through a single connection to your drum module’s input.
Getting your signal routing right from the start saves you countless hours of troubleshooting weird cross-talk issues and false triggers later on. When connecting your triggers, start with polarity connection Option A as recommended in most wiring diagrams, then switch to Option B only if you experience signal issues during testing.
TRS Cable Connections
Three critical contact points define TRS cable functionality in hybrid drum setups: the tip carries your positive signal, the ring handles the negative signal, and the sleeve provides essential grounding that eliminates unwanted noise interference.
I’ve found that proper TRS connections dramatically improve signal integrity, especially when you’re running longer cable distances between your acoustic drums and electronic modules.
For dual-zone trigger applications, you’ll want to follow this specific wiring approach:
- Connect your drumhead piezo sensor to the tip conductor for primary zone triggering
- Wire your rim sensor to the ring conductor for secondary zone activation
- Join both sensor grounds to the sleeve connection for noise elimination
- Verify polarity alignment matches your drum module’s input requirements before final connection
Quality shielded cables prevent electromagnetic interference that could compromise your hybrid setup’s performance.
Signal Routing Setup
Now that you’ve mastered TRS wiring fundamentals, the next challenge involves mapping your entire signal chain from trigger inputs through your drum module to your final sound output destination.
Your signal flow begins at each trigger, travels through properly shielded cables to individual module inputs, then continues to your chosen sound monitoring system—whether headphones for practice, studio monitors for recording, or PA systems for live performance.
I’ve learned that organizing this routing systematically prevents the frustrating troubleshooting sessions that plague poorly planned setups.
Route your module’s main outputs to mixing consoles using balanced cables, utilize auxiliary outputs for personal monitoring, and always verify proper gain staging throughout the chain to maintain clean, latency-free sound reproduction across all connected devices.
For complex hybrid setups requiring multiple audio sources, consider incorporating an audio mixer with sufficient channel count and phantom power support to manage both your acoustic drum mics and electronic trigger signals simultaneously.
Configuring Your Trigger Module Settings
Now that you’ve connected your triggers to the module, it’s time to configure the brain itself, which honestly can feel overwhelming at first given the sheer number of parameters available.
You’ll need to start by setting up your input channels properly, selecting the appropriate trigger types for each drum you’ve outfitted with sensors, and loading the sound patches that’ll give you the tones you’re after.
These three foundational steps determine whether your hybrid setup responds naturally to your playing dynamics or becomes a frustrating exercise in chasing false triggers and missed hits.
Input Channel Setup
Once you’ve physically mounted your triggers on the drums, the next essential step involves connecting them to your trigger module and configuring the input channels properly, which I’ll admit can feel overwhelming at first but becomes straightforward once you understand the basic principles.
Channel compatibility becomes vital here, as each trigger needs proper trigger alignment with its corresponding input jack on your module.
Here’s my recommended input channel setup sequence:
- Connect triggers using supplied XLR or stereo cables to dedicated drum-specific jacks
- Verify signal presence by striking drums while watching channel indicators
- Configure dual triggers for rim and head sounds on single channels
- Test channel detection using the module’s automatic parameter adjustment features
Most modules feature preset kits that immediately map your connected triggers to appropriate sounds, eliminating tedious manual assignments.
Trigger Type Selection
After establishing your physical connections, selecting the appropriate trigger type becomes your module’s foundation for accurate sound detection, and honestly, this choice will make or break your hybrid setup’s responsiveness. You’ll encounter two primary options: single-zone triggers that detect hits on one area, typically the drumhead, and dual-zone triggers that differentiate between head and rim strikes.
| Trigger Type | Performance Benefits |
|---|---|
| Single-Zone | Simple setup, reliable detection |
| Dual-Zone | Separate MIDI assignments, enhanced realism |
| Roland RT-30HR | Inverted cone design reduces muffling |
| Yamaha DT-50S | Versatile mounting, consistent sensing |
Dual-zone trigger features include separate sensitivity controls for each zone, allowing rimshots and cross-stick techniques. While single-zone triggers use basic piezo elements, dual-zone models combine multiple sensors for nuanced detection.
Sound Patch Loading
With your triggers properly selected and connected, you’ll need to configure your module’s sound patches and settings to transform those electronic signals into the drum sounds you actually want to hear.
I’ve found that starting with a clean slate works best, so clear any existing sounds from your user kit before diving into patch customization options.
The configuration process involves several key steps:
- Navigate to your module’s instrument section to view and modify assigned sounds
- Disable default pad sounds to prevent conflicts with your custom patches
- Load user-created or third-party sound banks for personalized kit tones
- Experiment with sound layering techniques to blend acoustic and electronic elements
Proper patch loading guarantees your hybrid kit responds exactly how you envision it during performance.
Exploring Hybrid Sound Possibilities
When you’re setting up a hybrid drum kit, you’re fundamentally opening the door to a universe of sonic possibilities that extends far beyond what traditional acoustic drums can deliver on their own.
Through sophisticated sonic layering techniques, you’ll blend acoustic tones with electronic samples simultaneously, creating hybrid textures that span multiple musical genres from rock to electronic music.
Your trigger modules enable assignment of any sampled or synthesized sound, whether that’s reinforcing kick drum low-end for powerful bass response or adding 808 kicks and vocal samples to your acoustic palette.
You can adjust trigger sensitivity to control dynamic layering between acoustic and electronic components, while individual sample mixing per trigger allows precise shaping of these rich, complex soundscapes.
Step-by-Step Installation Process
Having explored the exciting sonic landscape that hybrid drums can create, it’s time to roll up your sleeves and get these triggers properly installed on your acoustic kit.
Roll up your sleeves and dive into proper trigger installation—the foundation of every great hybrid drum setup.
The trigger advantages become apparent once you’ve mastered proper placement, though I’ll admit the first installation can feel intimidating. Here are essential installation tips I’ve learned through countless setups:
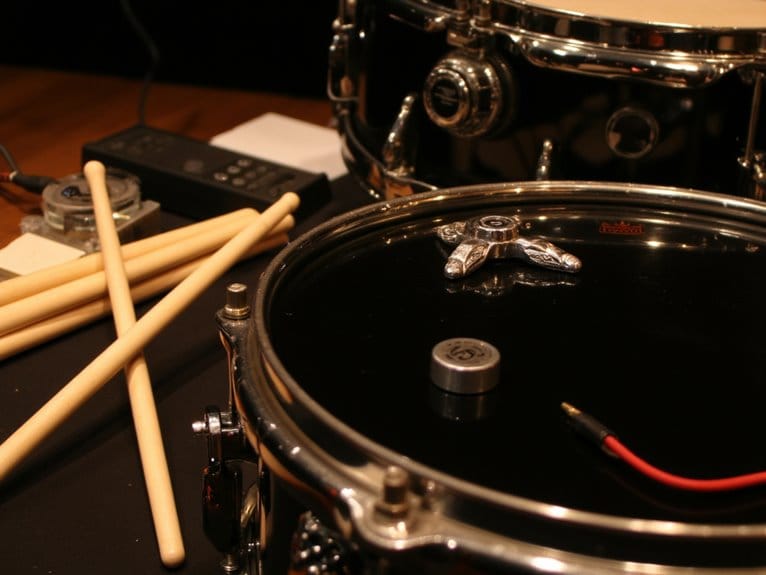
- Remove the drumhead completely – accessing lug screws requires full head removal, not just loosening
- Position triggers with 2-3mm clearance – this prevents false triggering while maintaining responsiveness
- Route cables through vent holes – protects connections from drummer movement and stick impact
- Install mesh heads at moderate tension – balances acoustic feel with electronic sensitivity
When selecting external microphones for your hybrid setup, ensure they can handle the high sound pressure levels exceeding 160 dB that drums typically produce.
Patience during initial setup pays dividends in consistent performance later.
Equipment Selection and Recommendations
The bewildering array of trigger options available today can make selecting the right equipment feel like traversing a maze, though understanding your specific needs will quickly narrow down the choices to manageable options.
When examining trigger brands, Roland’s RT-30 series stands out for its robust clamp-on design and exceptional sensitivity across toms and snares, while Yamaha’s DT50 offers precise triggering specifically optimized for their module ecosystems.
For electronic integration flexibility, ddrum triggers provide versatile single and dual-zone configurations that work seamlessly across multiple module brands, though I’ve found that brand-specific triggers typically deliver superior accuracy.
The Roland RT-MicS uniquely combines microphone and trigger capabilities, enabling sophisticated acoustic-electronic blending that transforms your hybrid setup into a truly dynamic performance instrument.
Professional triggers like the Roland RT-30HR feature dual-zone capabilities that allow independent head and rim triggering for enhanced creative possibilities in your hybrid setup.
Fine-Tuning Performance and Troubleshooting
While proper equipment selection establishes your hybrid setup’s foundation, achieving professional-quality performance requires meticulous calibration of trigger sensitivity, threshold parameters, and dynamic response curves that transform basic electronic integration into a seamlessly expressive musical instrument.
I’ve found that effective trigger calibration demands systematic response tuning through these essential steps:
- Threshold Settings: Adjust minimum strike force detection to eliminate background noise while maintaining responsiveness.
- Sensitivity Optimization: Fine-tune dynamic range using your module’s visual feedback tools to prevent false triggering.
- Crosstalk Prevention: Implement isolation methods including strategic sensor positioning and damping materials between drums.
- Dynamic Adjustments: Select appropriate response curves (linear, exponential, logarithmic) matching your playing style and drum characteristics.
When troubleshooting techniques reveal double triggering issues, gradually increase mask time parameters while testing rapid passages to maintain clean articulation without sacrificing playability.
For comprehensive audio capture in hybrid setups, consider integrating cardioid patterns from quality drum microphones to minimize bleed between acoustic and triggered elements while maintaining optimal sound isolation.
Frequently Asked Questions
How Much Does a Basic Hybrid Drum Trigger Setup Typically Cost?
You’ll spend $400-$600 for a basic hybrid setup with 3-5 triggers and entry-level module. Different trigger brands offer various pricing options, from $38 generic triggers to $108 Roland models, affecting your total cost.
On a final note
You’ve now got the foundation to transform your acoustic kit into a versatile hybrid setup that’ll expand your sonic palette beyond traditional drumming limitations. While the initial installation might seem intimidating, you’ll find that patience during the calibration process pays dividends in performance reliability. Don’t expect perfection immediately—even experienced drummers need time adjusting to trigger sensitivity and module responsiveness before achieving that seamless blend of acoustic warmth and electronic versatility.