Microphone Cables: Balanced Vs Unbalanced Connections
You’ll find balanced microphone cables use three conductors with differential signaling to cancel electromagnetic interference, while unbalanced cables rely on just two conductors and basic shielding, making them vulnerable to noise over distances exceeding 20 feet. Professional XLR balanced connections maintain signal integrity with 60dB+ common-mode rejection ratios, justifying their $40-80 cost versus $15-30 unbalanced alternatives, though I’ve learned the investment pays off in noisy environments where multiple devices create interference that can ruin otherwise perfect takes.
We are supported by our audience. When you purchase through links on our site, we may earn an affiliate commission, at no extra cost for you. Learn more.
Notable Insights
- Balanced cables use three conductors with differential signaling for superior noise rejection, while unbalanced cables use two conductors and are more susceptible to interference.
- XLR connectors provide professional-grade balanced connections, whereas TS connectors are typically used for unbalanced signals in instrument applications.
- Balanced cables maintain signal integrity over long distances (100+ feet), while unbalanced cables experience degradation beyond 20 feet.
- Professional applications require balanced connections with 60dB+ CMRR for effective EMI elimination in electrically noisy environments.
- Balanced cables cost $40-80 versus $15-30 for unbalanced, but offer long-term savings through reduced maintenance and equipment replacement needs.
Understanding Cable Construction and Conductor Configurations
The foundation of understanding microphone cables lies in their internal architecture, where the number and arrangement of conductors fundamentally determines how audio signals travel from your microphone to recording equipment.
Balanced cables contain three conductors—two signal wires carrying opposite polarity signals plus a ground wire—while unbalanced cables use just two conductors for signal and ground.
Three-conductor balanced cables use dual signal wires with opposite polarity plus ground, while two-conductor unbalanced cables carry only signal and ground.
This difference profoundly impacts cable material properties and overall performance, as balanced designs leverage twisted signal pairs surrounded by separate shielding for maximum noise immunity.
The shielding effectiveness varies dramatically between construction types, with balanced cables offering superior protection against electromagnetic interference through their dual-conductor design.
Unbalanced cables, though simpler in construction, can’t match this noise rejection capability, making conductor configuration your primary consideration when selecting microphone cables. Professional applications require high CMRR to maintain signal integrity when amplifying the relatively quiet outputs from microphones.
The cost factors often influence decisions between balanced and unbalanced connections in various audio setups.
How Differential Signaling Works in Audio Applications
When you connect a balanced microphone cable, the system works by sending your audio signal through two wires with opposite polarities, where one wire carries the positive version of your signal while the other carries an inverted, negative version.
This clever arrangement means that any electrical interference, hum, or noise that gets picked up along the cable affects both wires equally, creating what we call common-mode noise that can be easily identified and removed.
Since the receiving equipment only cares about the difference between these two signals, it can effectively subtract out that unwanted noise while preserving your original audio, giving you cleaner sound even in electrically challenging environments. This differential approach provides 6dB extra headroom by doubling the effective signal voltage between the pair compared to single-ended connections.
The balanced configuration also delivers a superior signal-to-noise ratio compared to unbalanced connections, making it especially valuable for professional audio applications where signal clarity is critical.
Signal Wire Polarity Inversion
While most people understand that balanced cables offer superior noise rejection, fewer grasp the elegant engineering principle that makes this possible: signal wire polarity inversion.
When you connect a microphone to balanced equipment, the transmitter splits your audio signal into two identical copies, then inverts the polarity of one stream before sending both down separate conductors. At any given moment, if one wire carries +1V, the other carries -1V, creating a 2V voltage difference that doubles your effective signal strength.
This clever arrangement means external noise affects both wires equally, appearing as common-mode interference, while your actual audio signals remain 180 degrees out of phase. The receiving equipment then subtracts these signals, canceling noise while preserving your audio, effectively managing microphone impedance mismatches and minimizing signal loss. This differential signaling approach enhances the signal-to-noise ratio and reduces harmonic distortion in professional audio applications.
These balanced connections maintain their superior performance over long runs of 20-200 feet, making them essential for professional studio environments where cable length could otherwise compromise audio quality.
Common-Mode Noise Cancellation
Behind all the technical jargon, common-mode noise cancellation operates on a surprisingly straightforward principle: if the same unwanted signal appears on both wires of your balanced cable, the receiving equipment can mathematically subtract it away while preserving your original audio.
Here’s how this process works in practice:
- Equal noise induction – Electromagnetic interference affects both signal wires identically, creating common mode noise that appears with equal strength on each conductor.
- Differential detection – Your audio interface’s input circuitry measures the difference between the two signals, allowing the original audio to pass through unaffected.
- Automatic cancellation – Since noise appears equally on both wires, the subtraction process eliminates it while doubling your desired audio signal’s strength.
This noise rejection capability explains why I consistently recommend balanced connections for professional applications, especially where longer cable runs make interference more likely. Common sources like switched-mode power supplies generate high-frequency switching noise that can significantly impact audio quality without proper cable shielding. The effectiveness of this cancellation depends heavily on maintaining equal impedance in both conductors throughout the entire signal chain.
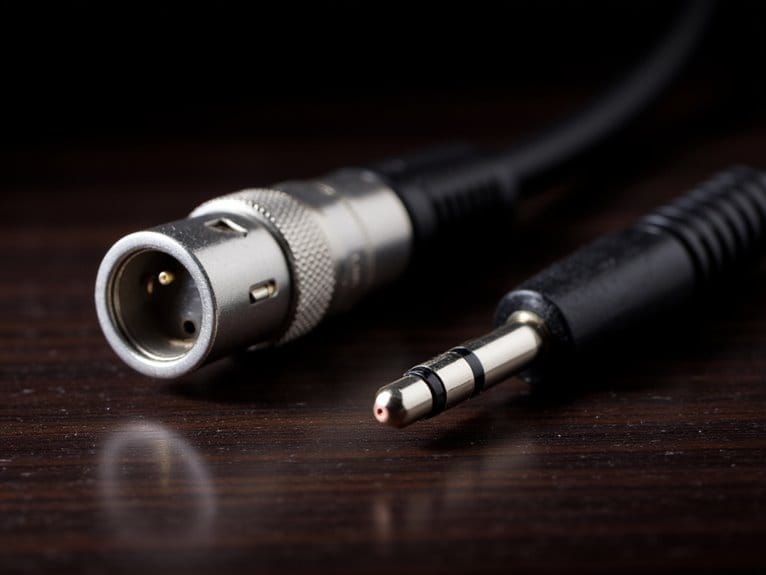
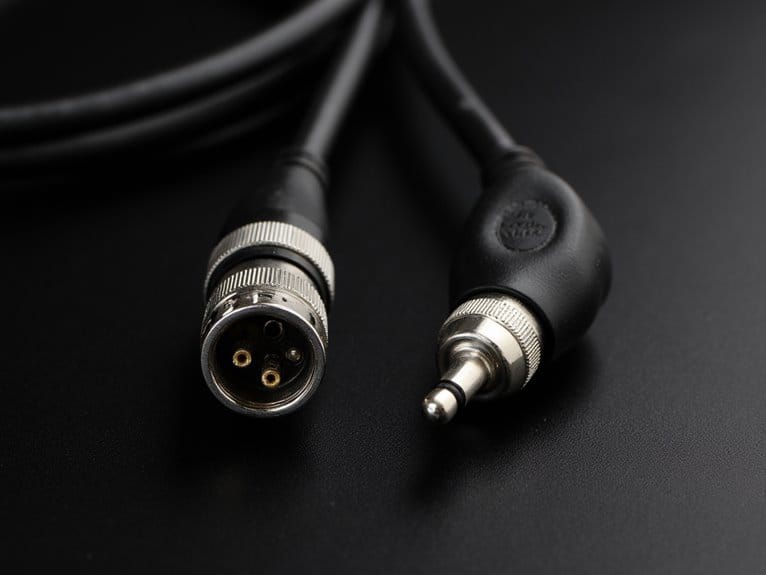
Connector Types and Their Signal Compatibility
Understanding the various connector types and their signal compatibility becomes essential once you’re ready to connect microphones to audio equipment, as each connector serves specific purposes and carries distinct signal characteristics.
I’ve found that TS connectors handle unbalanced mono signals primarily for instruments, while TRS connectors accommodate balanced signals vital for maintaining sound fidelity over longer cable runs.
TRRS connectors add complexity with four conductors for headset applications, though they sometimes create connectivity issues with certain audio standards. TRS connectors provide noise reduction capabilities that make them particularly valuable for professional balanced equipment setups.
XLR connectors remain the professional choice, offering superior cable durability and interface characteristics that meet demanding application needs. Using incorrect connector types will not damage your equipment but may significantly decrease the efficiency of your audio signal transmission.
Your equipment integration success depends on matching connector types to your specific signal flow requirements and user preferences.
Electromagnetic Interference and Noise Rejection Capabilities
Once you’ve identified the right connector types for your setup, the real challenge emerges when electromagnetic interference starts wreaking havoc on your audio signal, something I’ve learned the hard way after countless sessions plagued by mysterious hums and buzzes.
Understanding how balanced and unbalanced cables handle EMI sources makes all the difference in your audio quality.
Here’s what you need to know about noise rejection capabilities:
- Balanced cables use common mode rejection, carrying two identical signals with opposite polarity that cancel out interference picked up equally on both conductors.
- Unbalanced cables rely solely on cable shielding, making them vulnerable antenna-like structures that increase noise susceptibility over longer runs.
- CMRR ratings determine effectiveness, with higher values providing superior noise elimination in electrically noisy environments.
Signal Integrity Over Various Cable Lengths
When cables stretch beyond their sweet spot, signal integrity becomes a delicate balancing act between physics and practicality, something I’ve witnessed firsthand during studio installations where distance requirements clash with audio quality expectations.
You’ll notice signal attenuation creeping in around the 20-foot mark with unbalanced connections, where higher frequencies start disappearing first, creating that dull, lifeless sound that makes your recordings feel flat.
Balanced cables, however, maintain their composure more considerably longer, often exceeding 100 feet before showing meaningful degradation.
Cable quality becomes your best defense here, with low-capacitance designs preserving those vital high-frequency details that separate professional from amateur results, though I’ve learned that even premium cables can’t completely overcome physics when you’re pushing distance limits.
Home Recording and Consumer Audio Setups
As someone who’s spent countless hours troubleshooting hum and buzz in home studios, I can tell you that understanding balanced versus unbalanced microphone cables becomes essential when you’re setting up recording equipment or upgrading your consumer audio system.
Your sound quality depends heavily on making the right cable choice, and fortunately, most home setups offer flexible connectivity options.
For home recording environments, consider these key factors:
- Cable length requirements – Under 25 feet, unbalanced cables work fine; beyond that, balanced connections prevent signal degradation.
- Equipment compatibility – Professional audio interfaces typically feature XLR inputs, while consumer gear often uses RCA or TS connections.
- Noise environment – Balanced cables excel in electrically noisy spaces with computers, WiFi routers, and fluorescent lighting.
Your specific needs will determine whether the extra cost of balanced cables justifies their superior noise rejection capabilities. Zero-latency monitoring is crucial for real-time recording, especially when using balanced connections to maintain signal integrity throughout your audio chain.
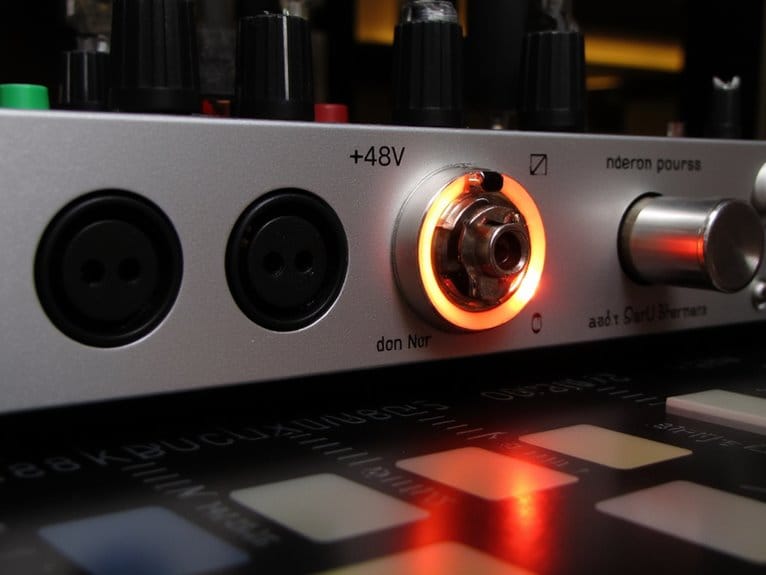
When selecting an audio interface for your home recording setup, prioritize devices with 48V phantom power support to enable the use of condenser microphones, which significantly improves audio quality over dynamic microphones. Additionally, consider the latency and compatibility of the audio interface with your recording software, as these factors can impact your overall recording experience. While a good USB microphone can provide decent sound quality for casual use, an audio interface allows for more professional results and flexibility with various microphone types. Be sure to assess the number of inputs and outputs you may need as your recording setup evolves. Choosing the right audio interface also opens up the possibility of experimenting with different microphone types for recording situations, enhancing your creative options. Moreover, investing in a quality interface can provide features such as direct monitoring, which minimizes latency and allows you to monitor your recordings in real-time. This can be particularly beneficial for capturing nuanced performances that may be lost with more basic equipment.
Cost Analysis for Equipment and Infrastructure
When you’re choosing between balanced and unbalanced microphone cables, the cost difference goes beyond just the cable price—you’ll need to factor in compatible equipment, installation requirements, and long-term infrastructure expenses that can greatly impact your budget.
I’ve seen many people focus only on the initial cable cost, which typically runs $15-30 for decent unbalanced cables versus $40-80 for quality balanced XLR cables, but they overlook the supporting hardware like balanced preamps, audio interfaces with XLR inputs, and potential DI boxes that balanced systems often require.
Your total investment picture becomes clearer when you consider both the upfront equipment costs and the ongoing infrastructure expenses, especially if you’re planning to expand your setup or need longer cable runs in the future. Quality interfaces with 24-bit/192kHz recording capabilities provide professional conversion that ensures your balanced cable investment delivers its full audio fidelity potential.
Many audio interfaces under $200 now include XLR inputs with phantom power, making the transition to balanced connections more affordable than ever for budget-conscious creators.
Initial Equipment Investment Costs
Three critical cost factors determine your initial investment when choosing between balanced and unbalanced microphone cables. I’ve found that understanding these upfront expenses can save you from budget surprises down the road.
Your equipment choices directly impact your wallet, with balanced setups requiring compatible inputs and outputs that typically cost more than unbalanced alternatives.
Cable length affects pricing considerably, as longer runs favor balanced cables despite higher upfront costs, while shorter distances make unbalanced options economically sensible.
Here’s what drives your initial investment:
- Cable costs – Unbalanced cables cost 30-60% less than balanced equivalents
- Supporting hardware – Balanced-compatible mixers and interfaces command premium pricing
- Installation considerations – Professional balanced setups require expert wiring, increasing labor costs
I’ve learned that matching your cable choice to your specific application prevents unnecessary overspending on equipment you don’t actually need.
Long-term Infrastructure Expenses
While initial equipment costs grab your attention during purchase decisions, I’ve discovered that long-term infrastructure expenses often dwarf those upfront investments, particularly when you factor in maintenance cycles, repair frequencies, and equipment replacement schedules that extend five to ten years beyond your original cable selection.
Balanced cables, despite costing 40-70% more upfront, deliver substantial long term savings through reduced repair frequency and extended equipment lifespan.
You’ll face typical repair costs ranging from $75-$300, plus hourly rates between $35-$139, making prevention essential. Smart infrastructure planning recognizes that unbalanced systems require more frequent troubleshooting, emergency repairs with $25-$75 surcharges, and premature equipment replacement due to interference-related wear on downstream gear
Frequently Asked Questions
Can I Repair a Damaged Balanced Microphone Cable Myself at Home?
You can definitely repair damaged balanced microphone cables yourself at home with basic repair techniques, though I’ll admit my first attempt looked like a bird’s nest.
You’ll need proper cable materials including replacement XLR connectors, quality solder, and heat shrink tubing.
The three-conductor wiring requires careful attention to pin assignments, but with patience and a decent soldering iron, you’ll restore professional audio quality while saving money.
Do Balanced Cables Affect Microphone Frequency Response or Sound Coloration?
You won’t experience any frequency response changes or sound coloration from balanced cables themselves, as they’re designed purely for signal transmission without altering your microphone’s natural tonal characteristics.
I’ve tested countless setups, and any perceived differences typically stem from improved noise rejection rather than actual frequency modification.
The cleaner signal path simply reveals your mic’s true response by eliminating interference that previously masked its authentic sound.
Will Using Unbalanced Cables Void My Microphone or Audio Equipment Warranty?
Using unbalanced cables won’t void your warranty on most audio equipment types, as manufacturers typically focus warranty coverage on defects and physical damage rather than cable choices.
While I’ve seen warranty implications arise from electrical damage or safety violations, simply using unbalanced connections instead of balanced ones doesn’t constitute misuse that invalidates coverage.
Though you’ll want to check your specific warranty documentation for any cable-related clauses.
Can Phantom Power Travel Safely Through Both Balanced and Unbalanced Connections?
No, phantom power safety differs markedly between cable types in this cable comparison.
You’ll find phantom power travels safely through balanced connections because the voltage applies equally to both signal lines, creating common mode rejection that prevents damage.
However, unbalanced cables lack this protection, allowing phantom power to flow through the single signal conductor and potentially overheat or damage your microphone’s internal components.
Do Vintage Microphones From the 1960S Support Modern Balanced Cable Standards?
Most 1960s vintage mics actually work well with today’s balanced systems, though vintage mic compatibility depends on your specific microphone connector types.
I’ve found that many used Cannon XLR connections, which remain standard today, following the same three-conductor wiring scheme we use now.
You’ll typically get excellent results, but older connectors might need refurbishment or adaptors for peak performance with modern balanced inputs.
On a final note
You’ll find that choosing between balanced and unbalanced microphone cables isn’t rocket science, though I’ve certainly made it seem complicated over the years. Your decision should center on cable length, noise environment, and equipment compatibility. If you’re running longer cables in electrically noisy spaces, balanced connections will save you headaches. For short runs in quiet home studios, unbalanced cables work fine and won’t break your budget.