Advanced Mic Placement Techniques: Sculpting Your Sound
Hey there! In this article, we're going to dive into some awesome mic placement techniques that will completely transform your sound. Seriously, get ready to take your recordings to a whole new level!
We are supported by our audience. When you purchase through links on our site, we may earn an affiliate commission, at no extra cost for you. Learn more.
So, let's start with the basics. By understanding how to position your microphone just right and experimenting with different types of mics, you'll be able to capture the perfect sound for your recordings. It's like being a sculptor, shaping and molding your sound to create something truly unique.
Now, let's talk about proximity effect. Ever wondered how to add that extra depth and warmth to your recordings? Well, proximity effect is your secret weapon. By placing the microphone closer to the sound source, you can achieve a rich and intimate sound that will make your listeners go "Wow!"
But we're not stopping there. We're also going to explore some creative techniques for creating unique soundscapes. Think of it as painting with sound. With a little experimentation and some out-of-the-box thinking, you can create audio masterpieces that will blow people's minds.
Now, let's not forget about stereo mic techniques. By using two microphones strategically placed, you can create a spacious and immersive sound that will transport your listeners to a whole new world. It's like giving them front-row seats to a live performance.
And finally, we're going to focus on maximizing room acoustics. Your recording environment plays a huge role in the final sound you capture. We'll show you some tricks to make the most out of your space and achieve that crystal-clear, professional sound.
So there you have it! With these advanced mic placement techniques, you'll be able to sculpt your sound like never before. Say goodbye to mediocre recordings and hello to audio excellence. Get ready to unleash your creativity and fine-tune your sound to perfection. Let's dive in and make some magic happen!
Understanding the Basics of Mic Placement
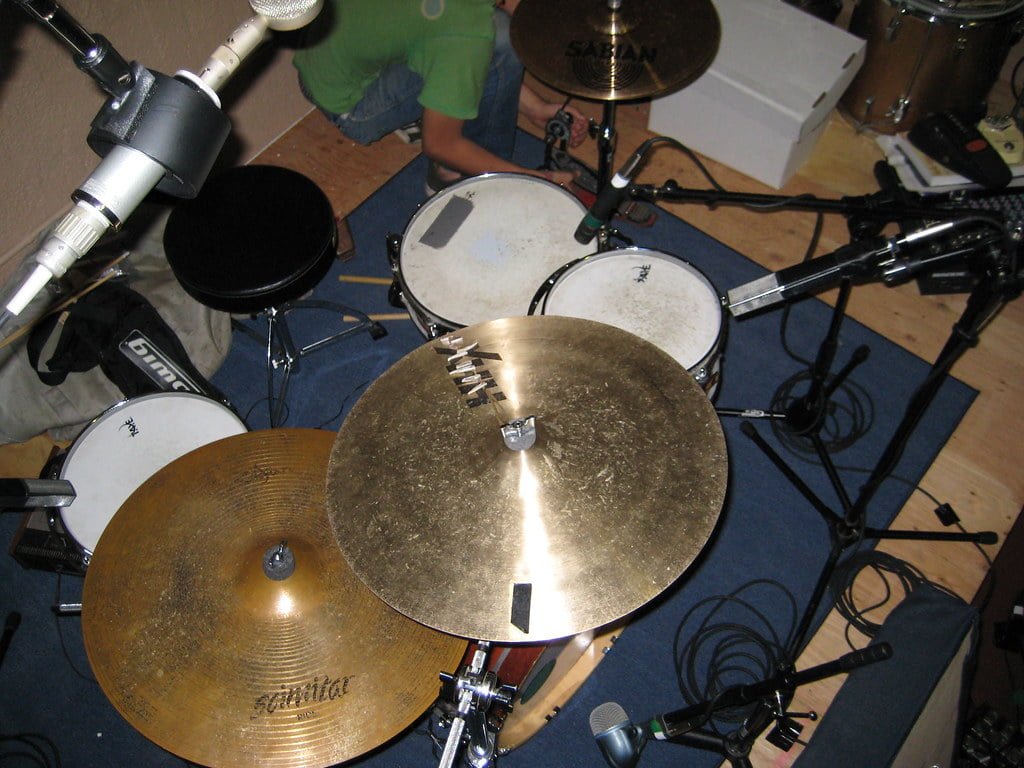
To achieve optimal sound quality, you should carefully position your microphone in relation to the sound source. Understanding the basics of mic placement is crucial for capturing the best possible audio. The first step is to consider the type of microphone you are using. Different microphones have varying pickup patterns, such as cardioid, omnidirectional, or figure-eight. Each pattern captures sound differently, so it's important to choose the right one for your specific needs. Once you have selected the appropriate microphone, the next step is to position it correctly. Placing the microphone too close to the sound source can result in distortion, while placing it too far away can lead to a weak or distant sound. Experiment with different distances and angles to find the sweet spot that captures the desired sound accurately. Remember to also consider the acoustics of the room and any potential background noise. By mastering the basics of mic placement, you can take your audio recordings to the next level of innovation and quality.
Exploring Different Mic Types for Optimal Sound Capture
Now let's delve deeper into the world of mic placement by exploring different types of microphones that will help you achieve optimal sound capture. Choosing the right microphone is crucial for capturing every nuance and detail of your sound. Let's start with dynamic microphones, known for their durability and ability to handle high sound pressure levels. They are ideal for live performances and recording loud instruments. Moving on to condenser microphones, these are known for their sensitivity and accuracy, making them perfect for capturing vocals and acoustic instruments. Ribbon microphones, on the other hand, offer a vintage sound with smooth high-frequency response, making them great for recording instruments like electric guitars and brass. Finally, lavalier microphones are small and discreet, perfect for capturing audio in interviews or presentations. By understanding the different microphone types and their strengths, you can choose the best mic for your specific recording needs.
Utilizing Proximity Effect for Added Depth and Warmth
You can enhance the depth and warmth of your sound by utilizing the proximity effect. This effect occurs when a microphone is placed closer to the sound source, resulting in an increase in bass frequencies. By positioning the microphone at a close proximity, you can achieve a richer and fuller sound, adding depth and warmth to your recordings. The proximity effect is especially useful for instruments such as vocals, acoustic guitars, and bass drums, where a warmer and more intimate sound is desired. Experimenting with different microphone positions and distances from the source can further enhance this effect. Keep in mind that the proximity effect can vary depending on the microphone type and polar pattern, so it's important to choose the right microphone for the desired effect.
Creative Mic Placement Techniques for Unique Soundscapes
Explore innovative mic placement techniques to create distinctive soundscapes that set your recordings apart. By experimenting with unconventional mic placements, you can capture unique and captivating sounds that will captivate your listeners. One technique to try is the "boundary microphone" method. By placing a microphone near a reflective surface, such as a wall or ceiling, you can capture a rich and natural reverberation. Another technique is the "mid-side" technique, which involves using two microphones – one facing forward and one facing sideways – to capture a wide stereo image with a focused center. Additionally, you can achieve interesting effects by placing microphones inside or near instruments, such as placing a microphone inside a piano to capture its resonant tones. These creative mic placement techniques will allow you to create soundscapes that are truly unique and innovative.
Achieving Balance and Separation With Stereo Mic Techniques
To achieve balance and separation with stereo mic techniques, it is important to regularly experiment with different microphone placements and configurations. By strategically positioning microphones, you can create a sense of width and depth in your recordings, enhancing the overall sonic experience. One effective technique is the X/Y configuration, where two cardioid microphones are placed closely together, with their diaphragms aligned. This technique captures a wide stereo image while maintaining a strong center focus. Another technique is the ORTF configuration, which uses two cardioid microphones spaced apart at a 110-degree angle. This technique provides a natural stereo image and excellent separation. Additionally, the Blumlein technique utilizes two figure-8 microphones positioned at a 90-degree angle to each other, capturing a spacious and immersive sound. Remember, experimenting with different mic techniques is key to achieving balance and separation, allowing you to sculpt your sound in innovative ways.
Maximizing Room Acoustics for Enhanced Recording Quality
To further enhance the balance and separation achieved with stereo mic techniques, it is crucial to optimize the room's acoustics for exceptional recording quality. Room acoustics play a vital role in capturing the true essence of a sound source. By understanding and harnessing the characteristics of your recording space, you can maximize the quality and clarity of your recordings. Start by addressing any reflections or echoes that may occur in the room. This can be achieved through the strategic placement of acoustic panels or diffusers. Additionally, consider the positioning of your microphones in relation to the room's natural resonances. Experimenting with different microphone placements can help you find the sweet spot where the room's unique acoustics enhance the recording without overpowering it. By optimizing your room's acoustics, you can elevate the quality of your recordings and deliver an immersive and captivating listening experience.
Fine-Tuning Your Sound With Mic Placement Adjustments
Make precise adjustments to your mic placement to fine-tune your sound and achieve the desired audio quality. Small changes in mic position can have a significant impact on the overall sound of your recordings. Experiment with different angles and distances to find the sweet spot that captures the essence of your sound. Moving the mic closer to the sound source will result in a more focused and intimate sound, while pulling it back will create a more spacious and ambient sound. Adjusting the height of the mic can also affect the sound, with higher placements emphasizing the highs and lower placements emphasizing the lows. Don't be afraid to experiment and trust your ears to find the perfect mic placement that brings your audio to life.
Conclusion
In conclusion, mastering advanced mic placement techniques is crucial for sculpting your sound and achieving optimal recording quality. By understanding the basics of mic placement, exploring different mic types, and utilizing proximity effect, you can add depth, warmth, and uniqueness to your soundscapes. Additionally, employing stereo mic techniques and maximizing room acoustics further enhance your recordings. By fine-tuning your sound with mic placement adjustments, you can achieve a balanced and separated sound that meets your desired artistic vision.