Electronics Troubleshooting: Common Guitar Wiring Issues
When your guitar starts crackling or loses signal, you’ll want to trace the path from output jack to pickups systematically, testing each component with a multimeter for continuity and resistance values. Most issues fall into predictable patterns: intermittent crackling usually means grounding problems at the jack, scratchy knob sounds indicate dirty potentiometers, and multiple pickup failures point to selector switch issues. Understanding these symptom patterns will help you pinpoint exactly where your signal chain breaks down.
We are supported by our audience. When you purchase through links on our site, we may earn an affiliate commission, at no extra cost for you. Learn more.
Notable Insights
- Test signal path systematically from output jack to pickups using a multimeter to check continuity and identify loose connections.
- Measure pickup resistance with a digital multimeter; typical readings should be 5k-15k ohms for proper functionality.
- Intermittent crackling during cable movement usually indicates grounding issues or oxidized contacts at the output jack.
- Scratchy noises when turning control knobs suggest dirty potentiometers requiring cleaning or replacement.
- Multiple pickup failures often point to selector switch problems rather than coincidental individual pickup malfunctions.
Identifying Signal Path Problems From Jack to Pickups
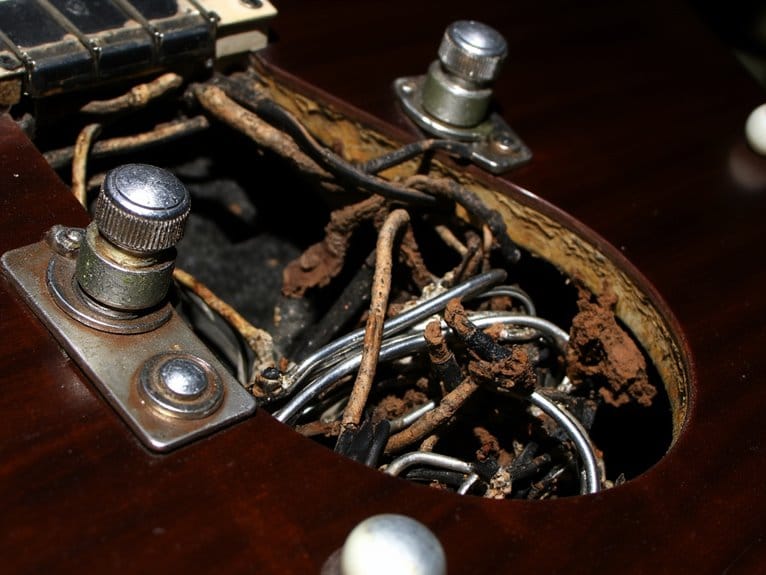
When you’re dealing with a silent guitar or intermittent crackling that drives you absolutely crazy, I’ve found that systematically tracing the signal path from output jack to pickups reveals the culprit faster than randomly poking around inside the control cavity.
Start by testing jack connections with a multimeter, checking for continuity between tip and sleeve terminals while wiggling the cable plug. Loose solder joints or oxidized contacts often masquerade as pickup failures.
Next, verify pickup functionality by gently tapping pole pieces with a screwdriver while connected to an amp-you should hear distinct clicks indicating magnetic response and signal presence. For testing purposes, a low-wattage combo amp works perfectly since you only need enough power to hear the signal response clearly.
If multiple pickups fail simultaneously, suspect switch or wiring faults rather than coincidental pickup deaths.
Once you’ve isolated the problem and completed your repairs, consider upgrading to a quality audio interface to ensure your guitar’s signal is captured with maximum clarity and minimal noise interference.
Testing and Diagnosing Faulty Components
How exactly do you pinpoint which component has failed when your guitar’s giving you grief? I’ve learned that systematic testing saves hours of frustration, starting with pickup measurements using a digital multimeter set to ohms. You’ll want resistance readings between 5k-15k ohms typically, though values vary by pickup type. If the readings are outside this range, it might indicate a problem with the pickup itself. It’s also crucial to debunk some vintage guitar myths and truths, as older instruments can exhibit unique quirks that affect their performance. By understanding these nuances, you can better assess the issues at hand and make informed decisions about repairs.
Systematic testing with a digital multimeter beats guesswork every time when troubleshooting guitar electronics.
The tap test comes next-lightly strike each pole piece with metal while plugged into an amp at medium-low volume, listening for clear clicks that confirm functionality.
For pot functionality, measure resistance values against specifications, usually 250k or 500k for guitars. Rotate the shaft while monitoring resistance changes, watching for smooth operation without dead zones.
Don’t forget capacitor testing using a capacitance meter to verify those critical tone circuit values.
Recognizing Symptom Patterns for Faster Repairs
Although troubleshooting guitar electronics can feel like detective work, I’ve found that recognizing specific symptom patterns dramatically speeds up the repair process and prevents you from chasing your tail through endless component tests.
Effective symptom recognition starts with understanding that most guitar wiring problems fall into predictable categories. When you hear intermittent crackling or signal loss, you’re likely dealing with grounding issues stemming from a poorly seated output jack, since all grounds converge at this critical connection point.
| Symptom | Most Likely Cause |
|---|---|
| Crackling during cable movement | Faulty output jack |
| Scratchy noise when turning knobs | Dirty potentiometer |
| Single pickup dropout | Failed pickup coil |
| Multiple pickup issues | Selector switch problem |
This systematic approach helps you target the actual problem component rather than testing everything randomly.
On a final note
You’ve now got the essential tools to tackle most guitar wiring problems systematically. Remember, I’ve found that 80% of issues stem from loose connections or corroded solder joints, so start there before diving into component replacement. Keep your multimeter handy, work methodically through the signal path, and don’t rush the diagnosis process. With practice, you’ll spot these patterns quickly and get back to playing instead of troubleshooting. Once you’ve addressed the common wiring issues, consider testing your setup with a looper pedal to ensure everything is functioning correctly. This device can help you identify any remaining issues with your signal chain by allowing you to layer sounds and hear any unwanted interference or dropouts. If you encounter any problems while using the looper pedal, it may indicate the need for further troubleshooting.