Recording in Untreated Rooms: Damage Control Techniques
You can achieve quality recordings in untreated rooms by strategically positioning your monitors flush against walls in spaces under 17×13 feet, using DIY acoustic treatments like heavy blankets and moving blankets wrapped around frames for under $200, and selecting cardioid microphones to minimize background noise pickup. Position yourself 38-42% into the room’s length to avoid standing wave nulls, while pairing open-back headphones with portable acoustic panels at first reflection points creates surprisingly professional results that we’ll explore further.
We are supported by our audience. When you purchase through links on our site, we may earn an affiliate commission, at no extra cost for you. Learn more.
Notable Insights
- Use cardioid microphones to minimize background noise and room reflections during recording sessions.
- Position recording setup strategically using furniture placement and removable acoustic treatments with adhesive hooks.
- Apply heavy blankets on windows and thick rugs on floors to reduce unwanted reflections.
- Create temporary absorption panels by wrapping moving blankets around frames for targeted treatment.
- Build DIY corner traps with mineral wool to control problematic bass frequencies effectively.
Strategic Speaker and Monitor Positioning
Three fundamental positioning decisions can make or break your monitoring accuracy in an untreated room, and I’ve learned through countless studio setups that getting these basics right often matters more than expensive acoustic treatment.
First, your speaker placement relative to boundaries determines whether you’ll fight bass buildup or achieve balanced response. In smaller rooms under 17×13 feet, I actually place monitors flush against walls to eliminate problematic reflections, while larger spaces benefit from boundary distance that reduces early reflections.
Second, toe your speakers inward so tweeters aim just behind your listening position, minimizing side reflections while focusing direct sound.
Finally, position yourself 38-42% into the room’s length to avoid standing wave nulls that’ll destroy your bass judgment, regardless of your room dimensions.
Budget-Friendly Acoustic Treatment Solutions
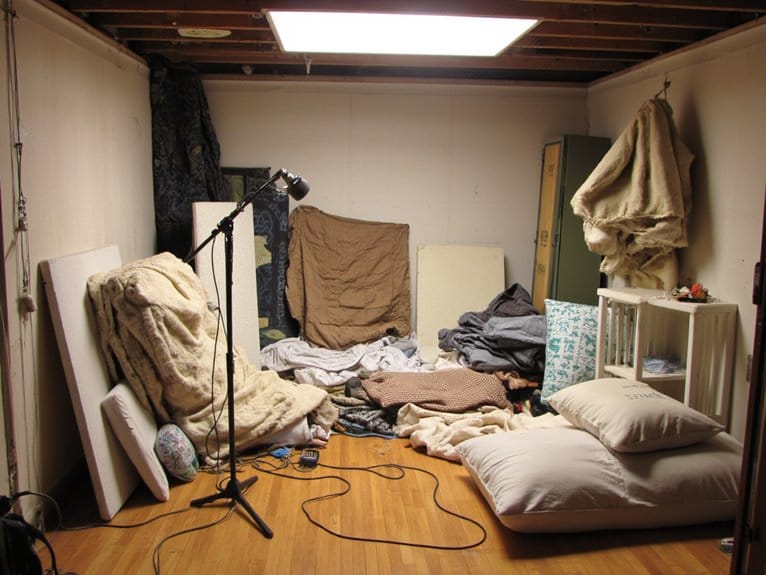
While professional acoustic treatment can cost thousands, I’ve discovered that strategic use of household items and simple DIY solutions often delivers 80% of the acoustic improvement for less than $200, making quality recording accessible even on the tightest budgets.
Heavy blankets hung over windows and thick rugs on hard floors eliminate most problematic reflections, while filled bookshelves naturally diffuse sound waves.
I’ve found that affordable materials like moving blankets wrapped around wooden frames create effective absorption panels, though I’ll admit my first attempts looked rather questionable aesthetically.
For bass control, homemade corner traps using mineral wool greatly reduce boominess without breaking the bank.
These DIY soundproofing methods, combined with strategic furniture placement and removable treatments mounted via adhesive hooks, transform any room into a surprisingly capable recording environment. The right microphone with a cardioid polar pattern can further minimize background noise and unwanted room reflections in these treated spaces.
When recording in these improved spaces, pairing your setup with an affordable audio interface can deliver professional-grade sound quality without the need for expensive studio rentals.
Measuring Room Performance and Problem Areas
Once you’ve implemented your budget-friendly acoustic treatments, measuring your room’s actual performance becomes essential for identifying which problems you’ve solved and which ones still need attention.
I’ll admit, diving into measurement software felt intimidating at first, but free tools like Room EQ Wizard make the process surprisingly straightforward.
Here’s what you’ll need to get started:
- A calibrated measurement microphone – USB models work perfectly for home studios.
- Multiple measurement positions – test your sweet spot and surrounding areas thoroughly.
- Low-frequency sine wave sweeps – these reveal room modes hiding between 20-150 Hz.
Your frequency response measurements will likely show dramatic differences between left and right speakers in untreated spaces, but that’s exactly the information you need to target your next treatment efforts effectively.
Mixing Techniques to Overcome Room Limitations
When your room measurements reveal the harsh reality of untreated acoustics, adapting your mixing workflow becomes more critical than buying expensive gear. I’ve learned this lesson through countless late-night sessions where my mixes sounded perfect in my bedroom studio but fell apart everywhere else.
Smart headphone selection becomes your secret weapon-open-back models like the Sennheiser HD600s provide natural soundstage while closed-back alternatives offer isolation from room coloration.
Open-back headphones reveal natural soundstage while closed-back models shield you from problematic room acoustics-choose your mixing weapon wisely.
I position my listening chair about one-third into the room length, avoiding that problematic center position where frequency response gets wonky.
Strategic EQ adjustments on your monitors help compensate for dominant room frequencies, while portable acoustic panels at first reflection points dramatically reduce splashy reflections without permanent installation.
On a final note
You can’t transform a bedroom into Abbey Road overnight, but you don’t need perfect acoustics to capture quality recordings. By positioning your monitors strategically, adding simple treatments like moving blankets and bass traps, measuring your room’s response with free software, and adapting your mixing approach to compensate for acoustic deficiencies, you’ll achieve surprisingly professional results without breaking the bank or your lease agreement.