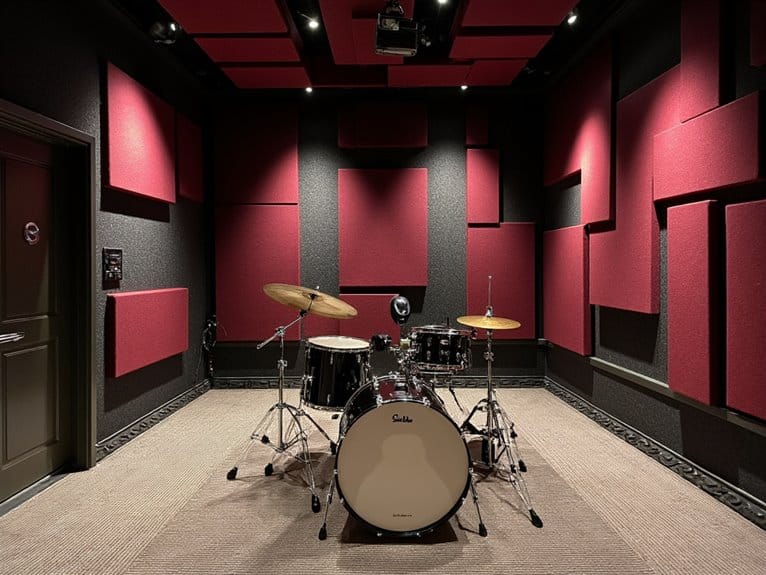
Soundproofing and Acoustic Treatment for Drum Rooms
You’ll need both soundproofing to keep your drums from escaping the room and acoustic treatment to control how they sound inside. Start by sealing air gaps around doors, windows, and outlets with acoustic sealant, since sound leaks through tiny cracks like water. Install thick acoustic panels covering 40% of your walls and ceiling, use floating floors with resilient pads, and replace hollow doors with solid-core alternatives for effective isolation that’ll keep neighbors happy while optimizing your recording environment.
We are supported by our audience. When you purchase through links on our site, we may earn an affiliate commission, at no extra cost for you. Learn more.
Notable Insights
- Build a “room within a room” using secondary timber framing with one-inch air gaps and isolation clips for maximum sound isolation.
- Seal all air leaks around doors, windows, outlets, and corners using specialized acoustic sealants and flexible elastomeric compounds.
- Cover 40% of wall and ceiling surfaces with 2-4 inch thick acoustic foam panels to control mid-to-high frequency reflections.
- Install floating floors on resilient pads and use full subfloor underlayment to minimize impact noise and vibration transmission.
- Replace hollow-core doors with solid-core alternatives and add mass loaded vinyl to surfaces for enhanced sound blocking.
Structural Soundproofing Methods for Maximum Noise Isolation
When I first started building drum rooms fifteen years ago, I quickly learned that slapping some foam on the walls won’t stop your neighbors from calling the police at 10 PM.
Foam on walls is amateur hour-real soundproofing means your neighbors won’t even know you exist.
You need serious structural modifications, and the most effective approach involves constructing a secondary timber stud frame inside your existing room, creating what we call a “room within a room” system.
These advanced frame techniques require maintaining at least a one-inch air gap between inner and outer walls, which acts as your primary sound break.
For ideal vibration control, you’ll install isolation clips made of dual-density silicone on the inner frame, effectively buffering sound waves before they reach the outer structure.
Don’t forget floating floors on resilient pads and suspended ceilings-these complete your decoupling system. Before beginning any construction, ensure your existing structure can handle the added weight from multiple soundproofing layers and reinforcement materials.
The foundation choice matters significantly since concrete flooring provides the best base for soundproofing compared to other materials.
Professional recording environments prioritize dynamic range to capture the full spectrum of drum frequencies without losing crucial sonic details.
Sealing Air Leaks and Sound Transmission Gaps
After you’ve tackled the major structural elements like walls and ceilings, you’ll discover that sound behaves like water, finding every tiny gap and crack to escape your drum room.
I’ve learned through countless projects that even the most expensive soundproofing materials become nearly worthless if you don’t address the seemingly minor air leaks around doors, windows, electrical outlets, and wall penetrations.
You’ll need to systematically detect these problem areas using hands-on inspection techniques, then seal them with specialized acoustic materials and door gap solutions that create the airtight barrier essential for effective noise isolation. The Sound Lock Door Seal Kit provides an excellent solution for eliminating gaps around door frames that commonly allow sound to leak through.
Detecting Common Leak Points
Even with the most carefully constructed soundproof drum room, I’ve learned that tiny air leaks can sabotage your acoustic investment faster than a cymbal crash at 3 AM.
Effective leak detection starts with simple visual inspection, where you’ll shine a bright flashlight around door perimeters, window frames, and electrical outlets to spot light bleeding through gaps.
I’ve found that sound transmission often occurs through the most overlooked areas: baseboards, wall corners, and HVAC penetrations.
Check electrical boxes carefully, as they’re notorious leak points that require acoustic putty pads or specialized caulking.
Don’t forget floor-wall junctions and ceiling intersections, where even hairline cracks can compromise your room’s acoustic integrity and allow drum frequencies to escape.
Acoustic Sealing Materials
Once you’ve identified where sound is escaping, selecting the right acoustic sealing materials becomes your next critical decision, and I’ve discovered that not all sealants are created equal when it comes to taming drum frequencies.
Specialized acoustic sealants remain permanently flexible, maintaining airtight barriers that prevent sound transmission through gaps around outlets, window frames, and wall intersections.
I recommend combining dense materials like Mass Loaded Vinyl with compressible foam strips for irregular surfaces, creating layered defense systems against airborne noise.
These elastomeric compounds don’t crack under building movement, unlike standard caulks that’ll fail within months.
When applied continuously along all seams and penetrations, quality acoustic sealants can boost your room’s Sound Transmission Class rating by five to ten points.
Door Gap Solutions
Three primary leak points around drum room doors consistently undermine even the most carefully planned soundproofing installations, and I’ve learned that addressing each gap requires specific sealing strategies rather than hoping a single solution will handle everything.
| Location | Door Seal Types | Installation Tips |
|---|---|---|
| Bottom Gap | Door sweeps with aluminum frames and silicone strips | Mount on interior side, guarantee lip contact for compression |
| Perimeter Frame | Adjustable rubber/silicone gaskets | Compress 10-15% of thickness, avoid over-flattening |
| Multiple Layers | Two or three full-perimeter seal systems | Stagger seal positions, maintain proper closer pressure |
You’ll want perimeter seals filling smaller frame gaps while door sweeps handle the larger bottom opening. Quality installations often require adding concrete or wood lips since contractors typically create flush openings that can’t compress seals properly. Just as audio interfaces require proper shielding from electromagnetic interference, drum room doors benefit from comprehensive sealing approaches that address all potential sound transmission paths.
Wall and Ceiling Treatment Materials for Sound Control
The foundation of effective drum room acoustics begins with selecting the right wall and ceiling treatment materials, and I’ve learned through years of testing that the wrong choice can turn even the most expensive drum kit into a muddy, echoing mess.
Acoustic foam panels remain my go-to solution for mid to high frequencies, offering easy installation and reliable performance when you’re working with 2-4 inch thickness. However, you’ll need more than absorption alone-sound diffusion treatments prevent that overly dead sound that makes drums feel lifeless.
I always recommend covering approximately 40% of your wall and ceiling surface area, incorporating bass traps in corners for low-frequency control, and leaving air gaps behind panels to maximize absorption efficiency.
Floor and Door Soundproofing Solutions
After treating your walls and ceiling, you’ll need to tackle the two most challenging soundproofing elements in any drum room: your floor and door, which require specialized approaches that differ greatly from vertical surface treatments.
I’ve found that proper floor underlayment installation creates the foundation for impact noise control, while door mass enhancement addresses the weak points where sound typically escapes your practice space.
These critical components demand careful attention to both material selection and installation techniques, since even minor gaps or improper mounting can undermine your entire soundproofing investment.
Floor Underlayment Installation
When you’re ready to tackle floor underlayment installation in your drum room, I’ve found that proper preparation makes the difference between a mediocre soundproofing job and one that actually works.
The underlayment benefits become apparent when you achieve full subfloor coverage, preventing structural and airborne noise from sneaking through gaps I’ve seen ruin otherwise solid installations.
Your thickness considerations should factor in your flooring type and desired sound attenuation, typically ranging from 2mm to 12mm.
I always seal edges and joints meticulously, since vibration leaks at these connection points can undermine your entire effort.
Layer the underlayment beneath your finished flooring-whether hardwood, tile, or carpet-and you’ll create invisible soundproofing that integrates seamlessly with your room’s design.
Door Mass Enhancement
Once you’ve handled your floor underlayment, door mass enhancement becomes your next critical barrier against sound transmission, and I’ll admit I used to underestimate just how much difference a properly weighted door makes in drum room acoustics.
Your standard hollow-core door won’t cut it when dealing with aggressive drumming sessions that need serious containment.
Here’s what actually works for door mass enhancement:
- Solid-core doors provide considerably denser construction than hollow alternatives, blocking sound waves through sheer mass.
- Mass-loaded vinyl adhesion directly to door surfaces adds flexible, heavy material designed specifically for sound blocking.
- Custom door construction using dense materials like MDF or plywood layers increases overall mass substantially.
- Heavy soundproof fabric wrapping around fiberglass insulation creates custom panels that enhance both mass and mid-range frequency absorption.
Acoustic Treatment for Optimal Drum Sound Quality
While soundproofing keeps your drum sounds from escaping the room, acoustic treatment transforms that contained space into an environment where your kit actually sounds its best.
Poor drum kit acoustics create sound reflection issues that muddy your recordings and practice sessions, making even quality drums sound amateur.
You’ll need acoustic panels at least 2 inches thick covering two adjacent walls minimum, plus ceiling-mounted acoustic clouds to control vertical reflections.
Bass traps in corners are essential since drums produce significant energy below 500 Hz, where standard foam fails miserably.
Space panels 2 inches from walls to increase absorption efficiency, and measure your room’s RT60 reverberation time to guide treatment decisions.
Balance absorption with diffusion panels to maintain natural sound character while eliminating problematic reflections.
Budget-Friendly Approaches and Practical Implementation Strategies
Professional-grade acoustic treatment delivers incredible results, but let’s be honest-most drummers don’t have thousands of dollars burning a hole in their pocket for studio-quality panels and bass traps.
Professional acoustic treatment works wonders, but most drummers can’t drop thousands on studio-grade soundproofing equipment.
Budget soundproofing doesn’t mean compromising effectiveness when you apply strategic DIY acoustic treatment methods.
Here’s my practical approach to affordable drum room soundproofing:
- Start with mass loaded vinyl sheets adhered directly to existing walls, adding density at reasonable cost while blocking sound transmission effectively.
- Replace hollow-core doors with solid-core alternatives, or apply adhesive vinyl soundproofing mats ($114 for 4×10 feet) to increase door mass substantially.
- Deploy bass wedge acoustic foam panels made from studio-grade materials, providing inexpensive yet noticeable reduction of drumming reflections.
- Elevate your kit using rubber pads to minimize vibration transmission through flooring, delivering immediate isolation improvements affordably.
When recording drums in your treated space, ensure your microphones maintain signal-to-noise ratios above 80 dB for professional audio quality that matches your acoustic investment.
Frequently Asked Questions
How Do I Soundproof My Drum Room Without Violating My Lease Agreement?
You’ll need lease compliant solutions like removable weatherstripping, heavy moving blankets, and freestanding acoustic panels. These temporary soundproofing materials don’t require drilling or permanent installation, keeping your rental agreement intact.
Can I Use Moving Blankets as Temporary Soundproofing for Drums?
Moving blankets won’t provide effective temporary soundproofing for drums since they lack the mass and density needed to block sound transmission. They’ll only reduce some echo and reflections within your room.
How Do Electronic Drums Compare to Acoustic Drums for Noise Reduction?
Electronic drums drastically reduce noise compared to acoustic drums since you’re triggering samples through headphones or amps. You’ll get near-silent practice versus acoustic drums’ 90-100+ dB output that disturbs neighbors.
On a final note
You’ve got the roadmap now, from structural isolation barriers that’ll keep your neighbors happy, to acoustic panels that’ll make your drums sing instead of just making noise. I’ve learned that combining proper soundproofing with smart acoustic treatment isn’t just about throwing money at expensive materials-it’s about understanding how sound works and applying targeted solutions. Start with air sealing, work your way up systematically, and you’ll create a drum room that performs.